You are reading the 3.x docs, an older version. Read the 5.x docs.
Installation.
Step-by-step guide to installing Reward Loyalty.
📋 Who This Is For
Reward Loyalty is self-hosted source code for developers and agencies. You'll need basic Laravel/PHP experience and your own hosting. We provide the code and documentation. You handle deployment and maintenance.
Install Reward Loyalty on your server by following these steps.
Quick Start
- Extract the downloaded package
- Upload files to your web directory
- Visit your domain
- Follow the installation wizard
Detailed Steps
Step 1: Extract and Upload
After purchasing Reward Loyalty, download the package from the current purchase store (linked on the /buy page). Extract the contents of the public_html directory and upload them to your web root.
Important: Install at your domain root (e.g., loyalty.example.com), not in a subdirectory (e.g., example.com/loyalty). Use a subdomain if needed.
Step 2: Run the Installer
Navigate to your domain in a browser. You'll see the installation wizard with a modern sidebar showing your progress through three steps: Requirements, Configuration, and Install.
Installation Wizard Steps
Step 1: Requirements
The wizard begins by verifying your server compatibility.
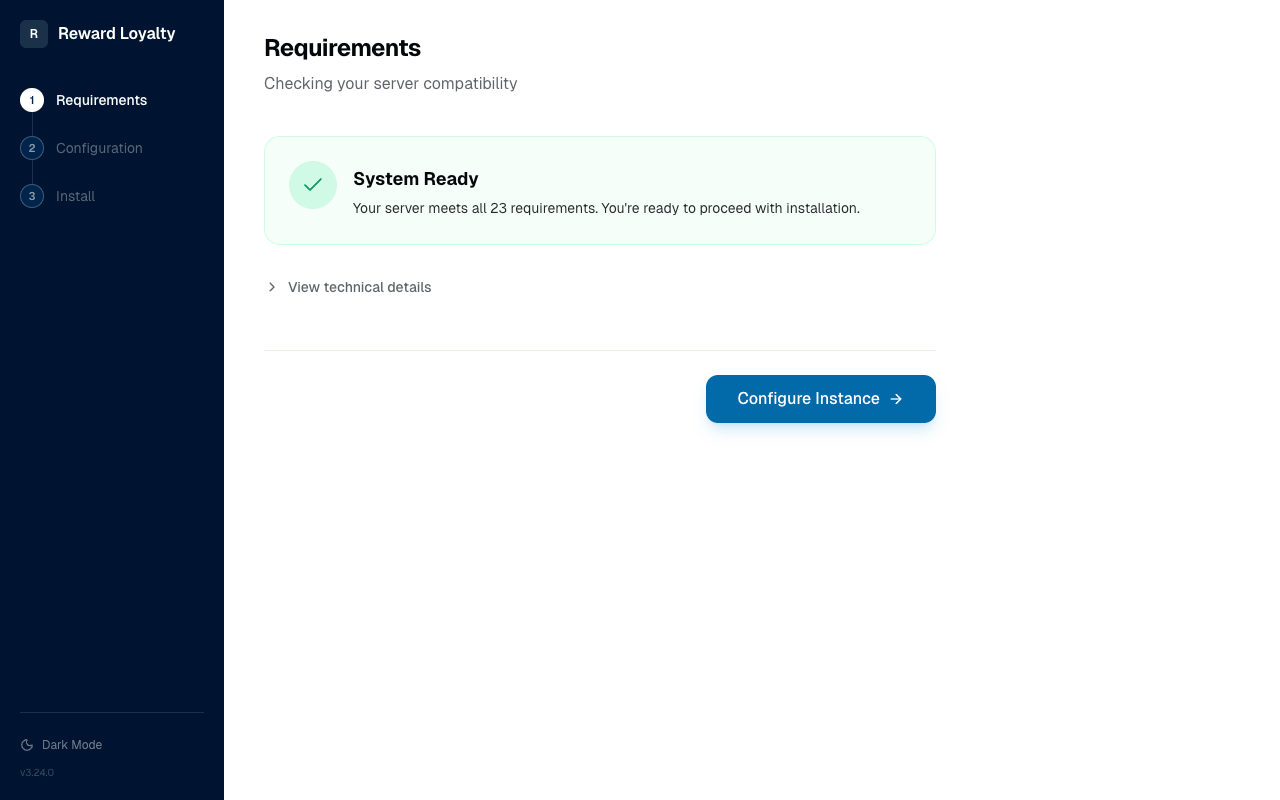
Once all checks pass, you'll see a System Ready confirmation. Click View technical details to see the full list of PHP extensions and versions.
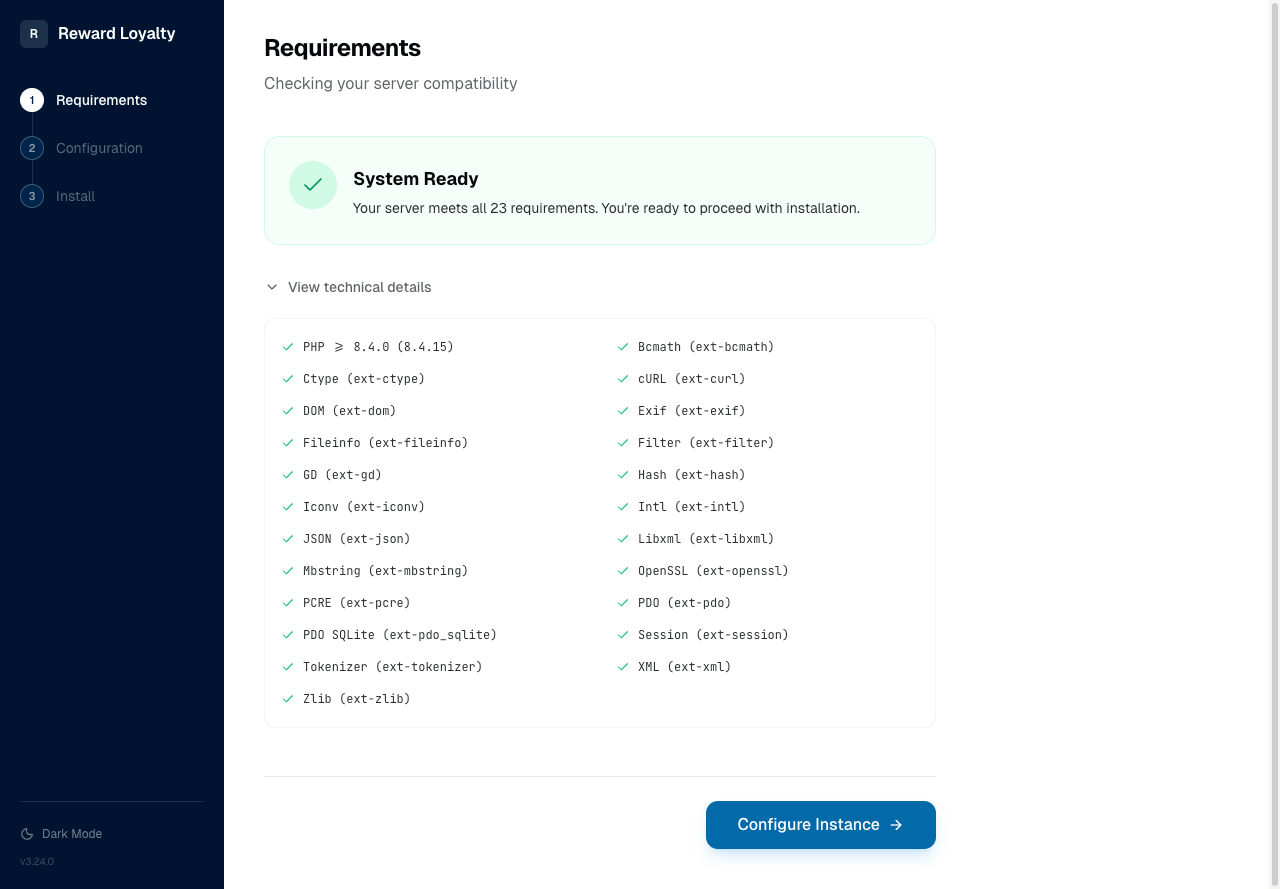
The requirements include:
PHP Extensions (23 checks):
- PHP ≥ 8.4.0 with required extensions
- BCmath, Ctype, cURL, DOM, Exif, Fileinfo, Filter
- GD, Hash, Iconv, Intl, JSON, Libxml, Mbstring
- OpenSSL, PCRE, PDO, PDO SQLite, Session
- Tokenizer, XML, Zlib, Zip
- MySQL 5.7+ or MariaDB 10.3+ with InnoDB storage engine (default on most servers)
Environment checks:
- Root directory writable , verifies the installer can create the
.envfile. If your web root isn't writable, you'll see instructions for adjusting permissions - Domain root installation , detects subdirectory installations (e.g.,
example.com/loyalty) that break routing and asset URLs. If detected, you'll see guidance to use a subdomain instead (e.g.,loyalty.example.com)
Note: Locale segments in the URL (e.g.,
/en-us/install) are not subdirectories. The installer ignores them.
If any check fails, contextual help appears with inline code examples. The technical details accordion opens when issues are found.
Click Configure Instance to proceed.
Step 2: Configuration
Set up your application settings, admin account, and database connection.
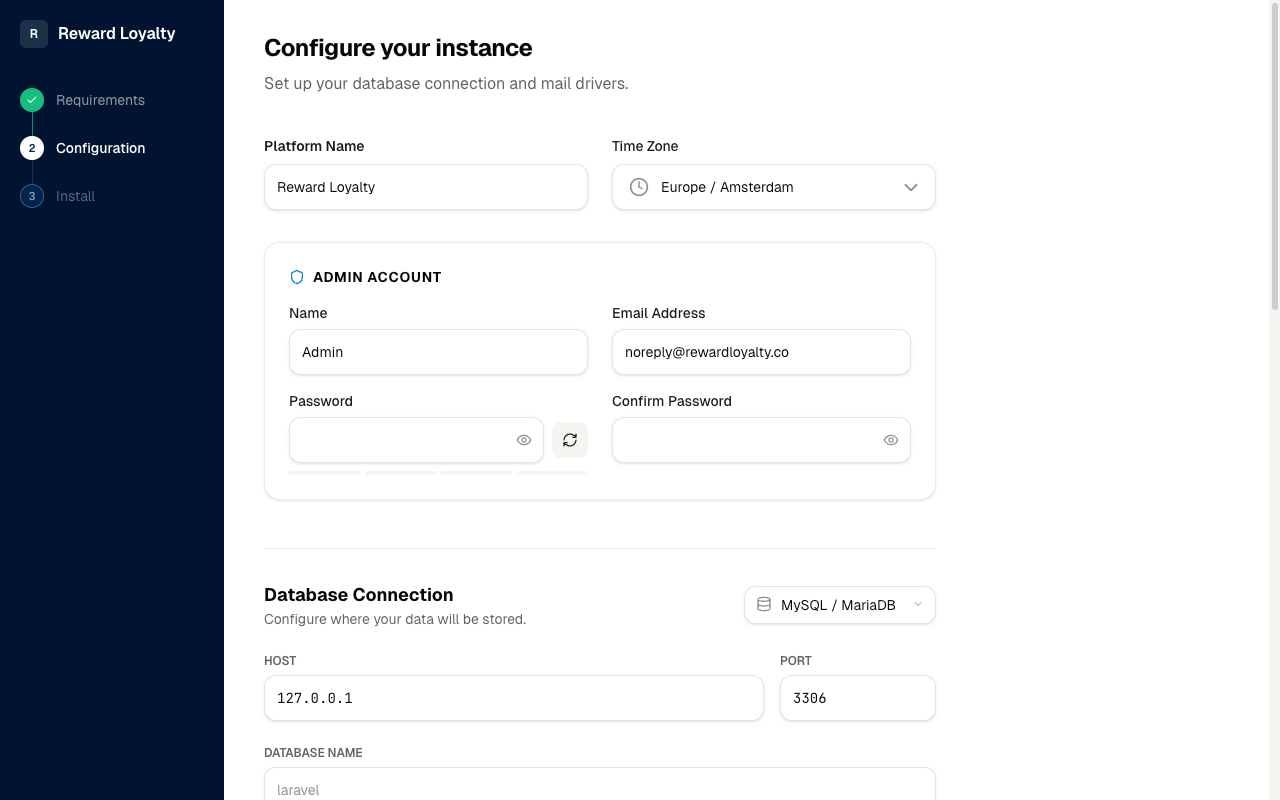
Platform Settings:
- Platform Name — The name displayed throughout your installation
- Time Zone — Select your timezone (defaults to your browser's detected timezone)
Admin Account:
- Name — Your display name as administrator
- Email Address — Used for login (receives OTP codes)
- Password — Set a strong password
- Confirm Password — Re-enter to verify
Database Connection:
- Driver — Choose MySQL/MariaDB or SQLite
- Host — Database server address (e.g.,
127.0.0.1) - Port — Database port (default:
3306for MySQL) - Database Name — The database to use
Email Configuration: Configure email delivery by selecting a mail driver. Email is essential because Reward Loyalty uses passwordless OTP authentication. See Email Configuration for setup instructions.
⚠️ Warning: Without working email, no one can log in. Always test your email configuration before proceeding.
Step 3: Ready to Launch
Review your configuration and optionally enable demo data before installing.
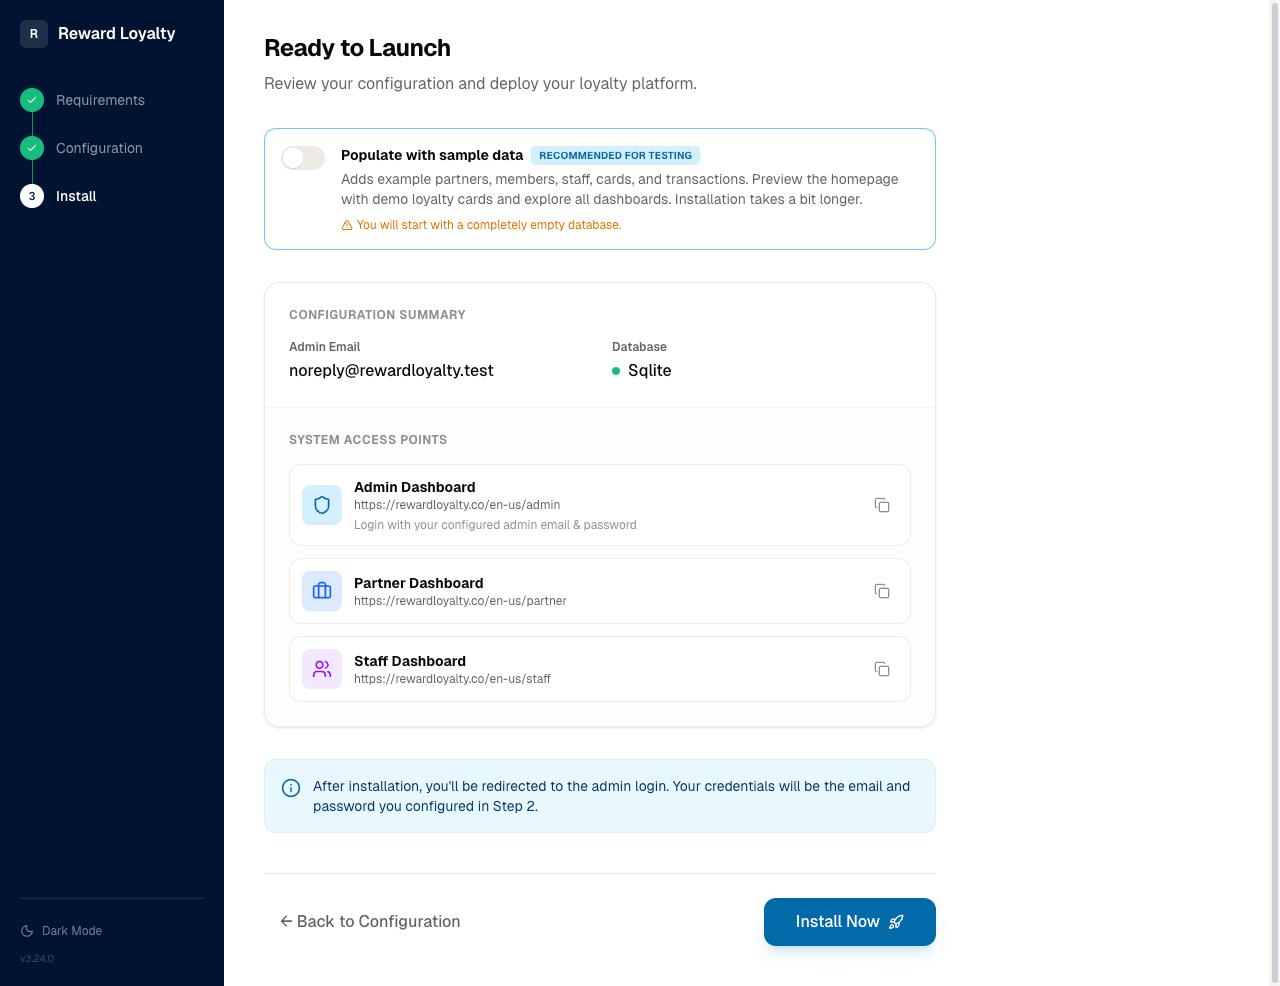
The page displays:
Configuration Summary:
- Your admin name and email address
- Selected database driver
- Selected mail driver
System Access Points:
- Admin Dashboard , where you'll manage the platform
- Partner Dashboard , for business owners
- Staff Dashboard , for employees
Demo Data Option
At the top of Step 3, you'll find the demo data toggle for evaluating the platform.
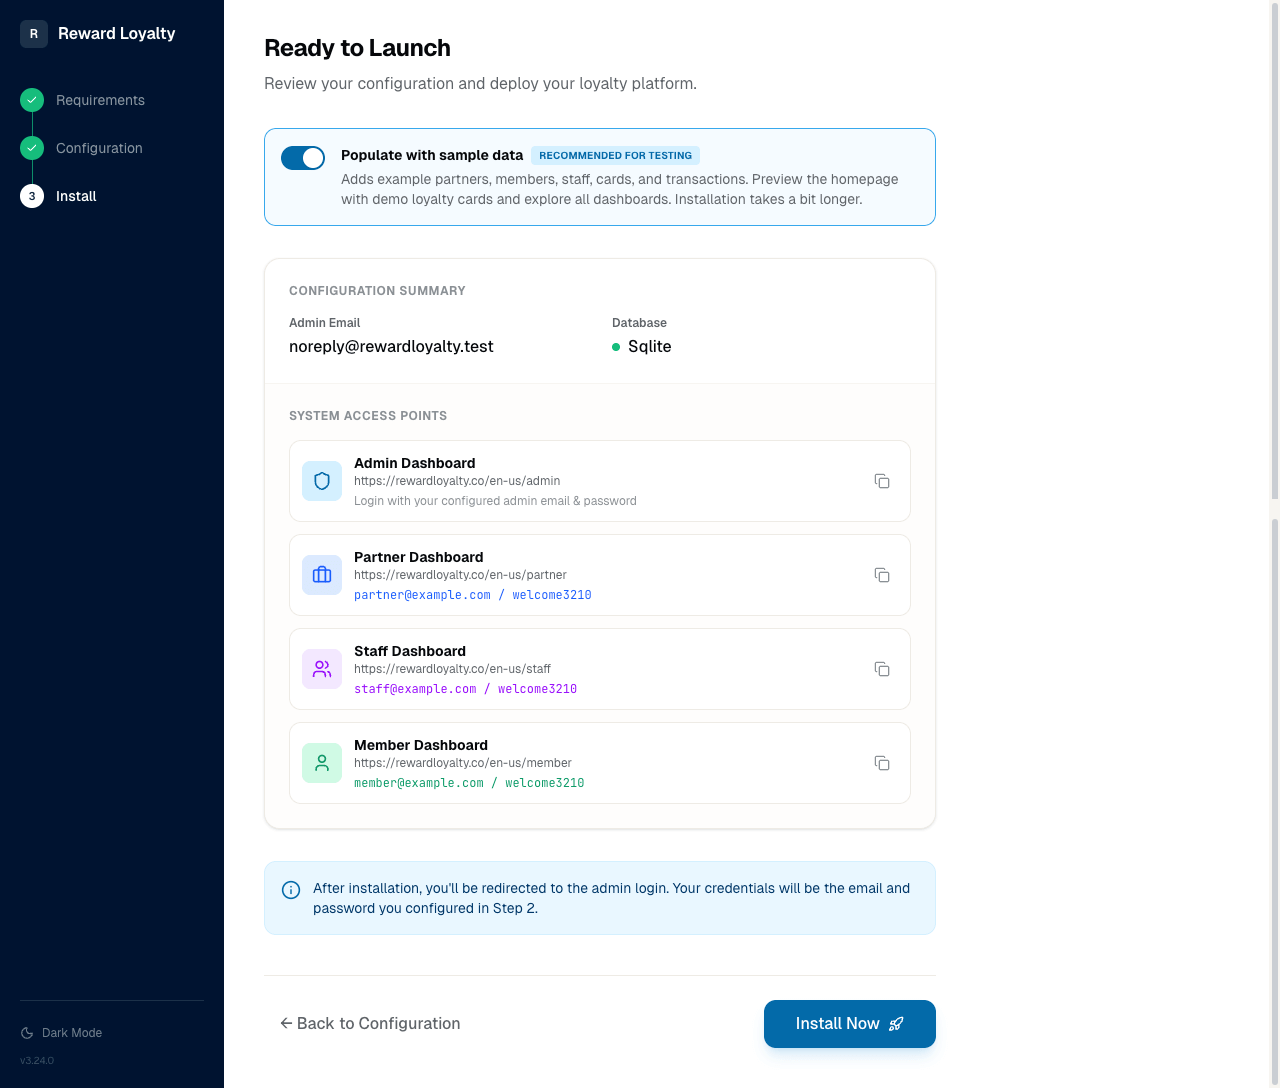
What the toggle does:
When enabled (recommended for testing), the installer populates your database with:
- Sample partners, members, and staff accounts
- Demo loyalty cards and stamp cards
- Example voucher campaigns
- Historical transaction data for analytics
Demo credentials displayed:
When enabled, the access points section expands to show demo login credentials:
| Account | Password | |
|---|---|---|
| Partner | [email protected] | welcome3210 |
| Staff | [email protected] | welcome3210 |
| Member | [email protected] | welcome3210 |
When to enable demo data:
- ✅ Client demonstrations — Show realistic dashboards instantly
- ✅ Feature exploration — See how all features work together
- ✅ Training — Let staff practice without risk
- ✅ Testing — Evaluate before going live
When to skip demo data:
- Production deployments
- When migrating real data
- If you prefer starting with a clean database
💡 Tip: Demo data cannot be enabled after installation.
What happens with demo data disabled:
You'll see an amber warning: "You will start with a completely empty database." This is fine for production. You'll create all content from scratch.
Installing
Click Install Now to begin the installation process.
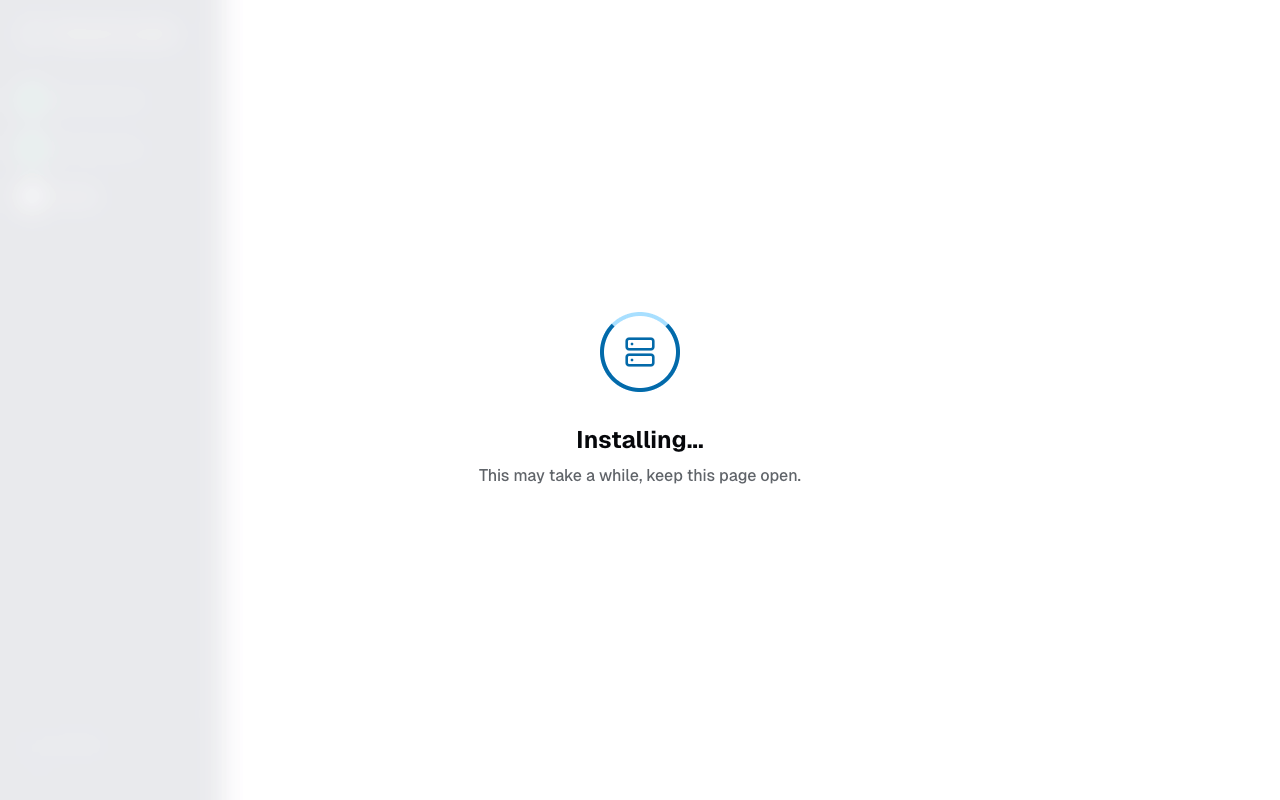
The installer will:
- Create database tables
- Run migrations
- Seed demo data (if enabled)
- Save your configuration to
.env - Set up the admin account
Installation time:
- Without demo data: Under 30 seconds
- With demo data: 30-60 seconds (additional seeding time)
⚠️ Important: Keep this page open during installation. Do not refresh or navigate away.
After Installation
After successful installation, you'll be redirected to the admin login page.
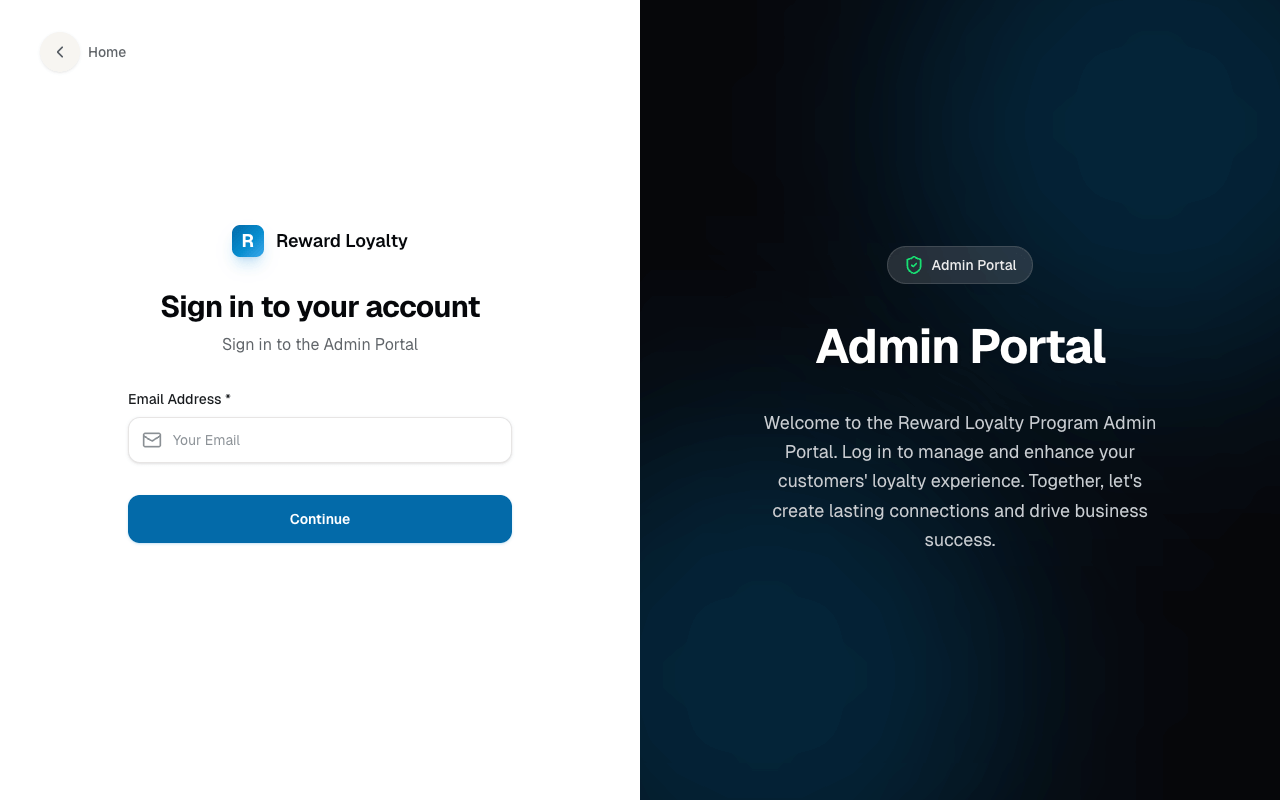
Log in using the admin email and password you configured in Step 2.
First steps as admin:
- Go to License & Updates to activate your license
- Create your first network
- Assign a manager or create partners directly
If you enabled demo data:
Your dashboards will already show realistic analytics, the homepage displays example loyalty cards, and you can log in to partner/staff accounts using the demo credentials to explore different user perspectives.
Staging Installation
We recommend maintaining two separate installations: a staging (test) environment and your production environment. Each license supports up to 3 domains, so your staging installation is covered by the same license. Local development domains (.test, .localhost) do not count against this limit.
Why Use a Staging Environment
Reward Loyalty is a large codebase with many dependencies. Updates can include framework upgrades, database migrations, and changes across hundreds of files. We test before each release, but every server environment is different. PHP versions, extensions, and custom modifications all create variables we cannot account for.
A staging installation lets you verify that an update works in your specific environment before it touches your live data. This is common practice for production software, and the best way to prevent downtime.
⚠️ Important: We are not responsible for updates that cause issues on production installations. Always test updates on staging first. We strive to deliver the highest quality at the most accessible price, but there is a tension between update frequency, quality, and cost. When issues arise, we work to resolve them fast.
Setting Up Staging
- Install a second copy of Reward Loyalty on a subdomain (e.g.,
staging.yourdomain.com) following the same installation steps above - Enable demo data during the staging installation. This gives you realistic data to test against, so you can verify that analytics, transactions, and other features work after an update
- Copy your production
.envdatabase settings to staging if you want to test against a copy of your real data instead (make a database backup first and restore it to a separate staging database)
Preventing Search Engine Indexing
Your staging installation should not appear in search engines. After installation, add the following to the .env file in your staging web root:
APP_DEMO=true
This sets <meta name="robots" content="noindex, nofollow" /> on all pages, telling search engines not to index your staging site.
You can also restrict access at the server level using .htaccess password protection or IP-based access rules. This prevents any public access to the staging site. If you use .htaccess password protection, add your .htpasswd file to PROTECTED_PATHS in .env so it survives automated updates. See What Gets Preserved for details.
Recommended Update Workflow
- Update your staging installation first using any of the three update methods
- Test by logging in as admin, partner, staff, and member. Verify transactions, analytics, and email delivery
- Check the changelog for breaking changes or migration notes
- Update production once you have confirmed everything works on staging
- Back up your production database before every update, regardless
A few extra minutes per update can save hours of downtime and data recovery.
Troubleshooting
Installation takes too long with demo data
This is expected behavior. Demo seeding adds 30–60 seconds to installation time. Wait for completion. Do not refresh the page.
Demo credentials don't work after installation
The demo data toggle was not enabled during installation. Either reinstall with the toggle enabled, or create accounts manually through the admin dashboard.
Empty dashboards despite enabling demo data
Installation may have failed partway through. Check your server error logs and reinstall if needed.
Cannot log in after installation
Email configuration may be incorrect. The login system requires working email to send verification codes. Check your email settings and ensure test emails are delivered.
Local Development
For local development, use Laravel's built-in server:
cd /path/to/reward-loyalty
php artisan serve
Access the application at http://localhost:8000.
Next Steps
- Set up a staging environment to test updates before production
- Updating, activate your license for dashboard updates
- Administration Guide, learn how to manage the platform