
Set up loyalty for your own business.
Follow one calm sequence from license to a working counter. Each milestone makes the decision here and links the current product documentation for the screens.
Give each service one clear domain.
Keep the site your customers already know at the root domain. Put Reward Loyalty on a focused application subdomain unless it is the whole website. Separate the sending identity and staging copy so a change in one does not blur the others.
Root or marketing
yourbrand.com
The existing business website and public brand home.
Application
loyalty.yourbrand.com
The member, staff, partner, and administration application.
Transactional email
mail.yourbrand.com
The authenticated sending subdomain used for OTP and service messages.
Staging
staging-loyalty.yourbrand.com
The safe copy for updates, restore tests, and configuration checks.
The three-domain license allowance gives room for production, staging, and test application domains. The marketing and email DNS names describe the operating topology, not extra application installations.
Set the model before the screens.
These choices keep the setup coherent. The linked documentation carries the screen-level procedure after the operating decision is made.
Choose the front door from the customer task
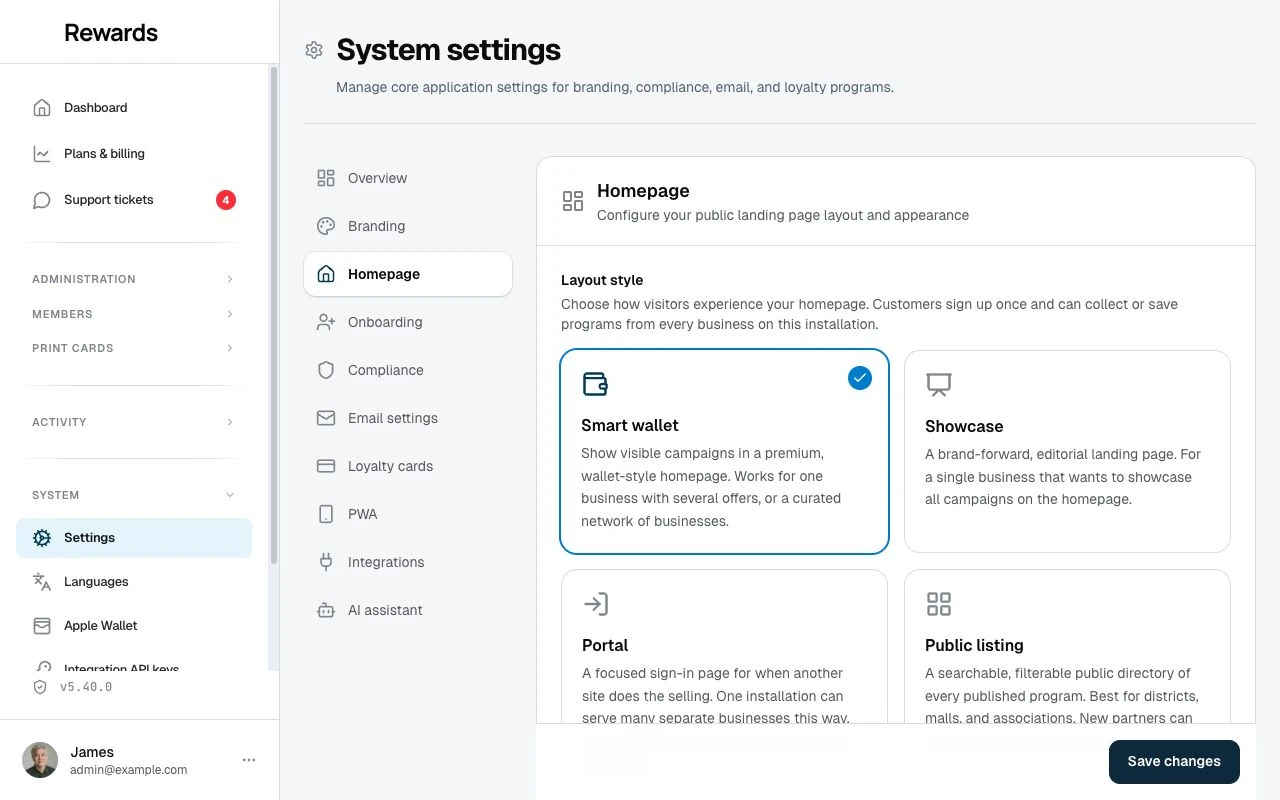
Use Showcase for a brand-forward entrance, Smart Wallet when this one business presents several campaigns together, or Portal when the counter QR should do most of the explaining.
Keep locations inside one business
One business can have several locations and location-specific staff. Concurrent counter writes are why MySQL/MariaDB remains the production recommendation.
Choose the member front door in administration.
The Homepage settings screen keeps Showcase, Smart Wallet, Portal, and Public Listing in one place. For one business, choose Showcase, Smart Wallet, or Portal from the customer task you want the first visit to support.
Nine milestones, in order.
Make the decision here, then open the owning documentation for the current screens. Do not skip the smoke test or the first restore proof.
-
1
Lay out your domains
Map the root or marketing domain, application subdomain, authenticated transactional-email subdomain, and staging domain. Point DNS deliberately, require HTTPS, and test the PWA from its final application origin.
Open the procedure -
2
Choose your hosting
Choose for real counter traffic, image storage, backups, scheduler access, and several locations writing at once. Use MySQL/MariaDB in production. Keep SQLite for evaluation or a genuinely low-write installation, and use the hosting directory to find candidates and check the requirements of your exact plan.
Open the procedure Open the hosting hub Download the compatibility checker -
3
Install and prove it
Follow the installation guide, then finish with the real smoke test. A loaded homepage is not the finish line.
- Sign in as the administrator
- Receive a real OTP email
- Credit a test member through a staff checkout
- Upload an image
-
4
Make email real
Connect transactional email from day one because OTP delivery controls access. Authenticate the sending domain with SPF, DKIM, and DMARC, know where bounces and complaints go, and prove a real OTP arrives. Host SMTP is an evaluation fallback.
Open the procedure -
5
Shape the front door
Set the business name, logo, color, and chosen layout. Showcase is the brand-forward option, Smart Wallet groups several campaigns for this one business, and Portal keeps the first visit focused on scanning or signing in.
Open the procedure -
6
Build your first program
Start with one loyalty mechanic and one worthwhile reward. Use stamps for frequent small purchases such as coffee or lunch, or points when basket sizes vary such as retail or salon. Price the reward before publishing it and add a second mechanic only after the first earns its keep.
Open the procedure Configure a points card Configure a stamp program -
7
Bring in people
Use the partner dashboard to set the business, create staff accounts for the locations they serve, and rehearse member lookup with the actual counter team. Let the first members join from the counter QR so enrollment and staff handoff are tested together.
Open the procedure Review member accounts Review the partner workspace -
8
Launch at the counter
Print the tested business or program QR, prepare the staff phone or tablet as the scanner, keep member search as a fallback, and run the first real checkout while the manager is present. Confirm the member sees the credited result.
Open the procedure Prepare staff scanning -
9
The first 30 days
Watch members joining, repeat visits, the first redeemed reward, staff corrections, and questions at the counter. Confirm backups are restorable, bring Health Center checks to green, and check updates on a calm cadence. Loyalty compounds slowly, and that is normal.
Open the procedure Inspect Health Center Prove the operating checks
Who sets this up.
Give your regular customers an extra service: a branded card, rewards for coming back, and nothing to install.
Reward Loyalty is software that a web agency or developer installs and runs. Ask the agency that built your website.
Send this page to your web designer
If you work with no agency or developer, a hosted tool may suit you better. Compare hosted tools