Creating your first program.
Step-by-step guide to setting up a stamp card
Create your first stamp card program in minutes. This guide walks you through every step, from basic details to reward configuration and visual customization.
Before you start
Ensure you have:
- At least one club created
- A clear idea of your reward and, if you want to show it, its monetary value
- If awarding bonus points: an active loyalty card to credit them to
Accessing the creation form
- Go to Stamp cards in the partner sidebar
- Click Create
- The creation form opens
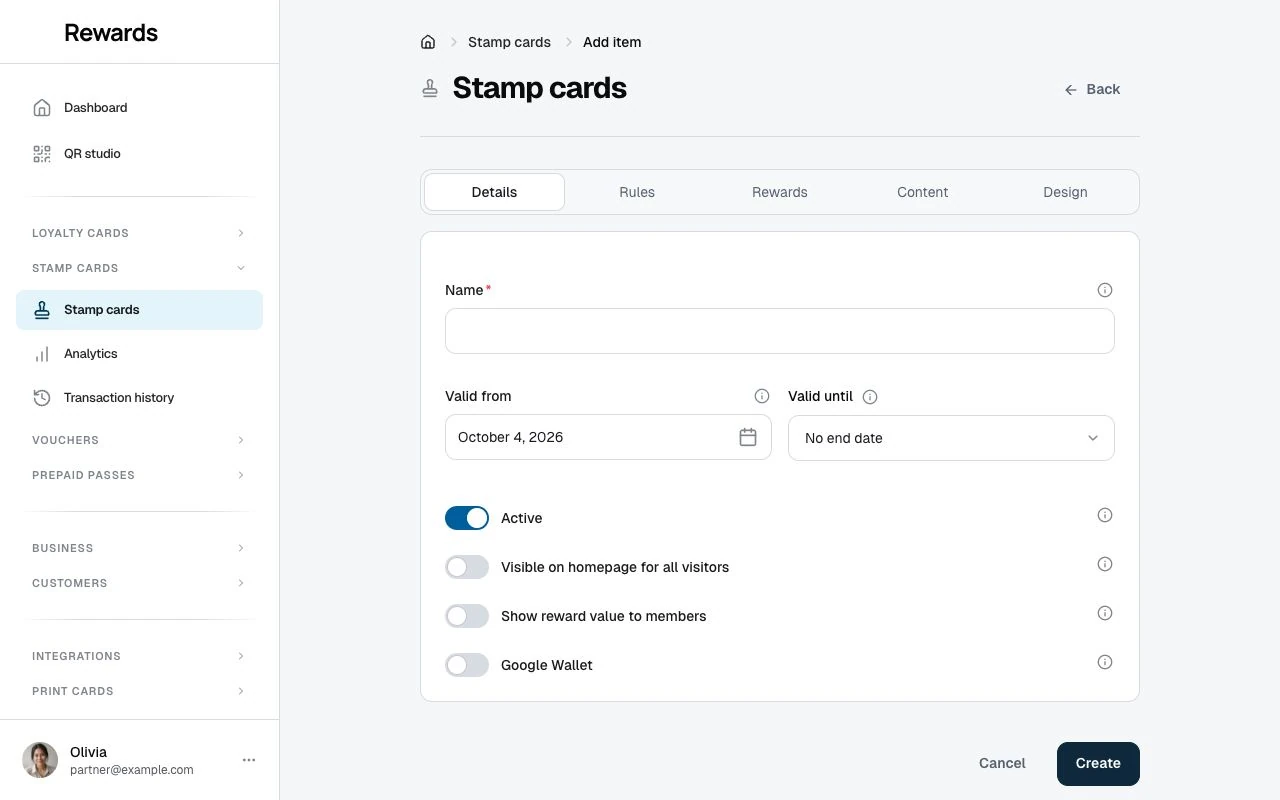
The form has five tabs: Details, Rules, Rewards, Content, and Design. Work through each tab to build your program, then click Create.
Important: Your account has a stamp-card limit. When you reach it, the Create button is hidden and the list shows a limit message. Contact your administrator to raise the limit.
Tab 1: Details
Internal configuration: identity, lifecycle, and visibility.
Club
Required: Yes
Select the club this stamp card belongs to. Customers can only participate in programs for clubs they have access to, and staff of that club award the stamps.
Name
Required: Yes Character limit: 128
For your organization only, not visible to customers.
Example: "Coffee Loyalty Card - Winter 2026"
Tips:
- Use descriptive names that help you identify programs
- Include season or campaign name if applicable
Valid from / Valid until
Required: No Format: Date and time pickers
The validity window for seasonal or limited-time programs. Valid from defaults to the current date and time; Choose No end date for an open-ended program, or Ends on to enter an end date and time. The creation form selects No end date by default.
Behavior:
- Before Valid from: customers cannot earn stamps yet
- After Valid until: earning and reward claims stop. The card and its history remain available in History
Active
Default: Enabled
Controls whether customers can earn stamps. Disable to pause a program without deleting it.
The list and details show Status from Active and the program's dates: Scheduled before the start, Available within the dates, and Expired after the end. Inactive takes priority when you pause it. Stamp expiry after inactivity remains a separate rule.
Visible on homepage for all visitors
Default: Disabled
Features the program on the customer homepage. This toggle appears only when homepage cards are enabled for your account.
Show reward value to members
Default: Disabled
When enabled, members see the reward's monetary value (set on the Rewards tab), and staff see it on the claim page.
Google Wallet
Default: Disabled
Lets members add this stamp card to Google Wallet. The toggle appears when the Google Wallet integration is enabled for your account. See Google Wallet for setup and pass design.
Apple Wallet
Open Apple Wallet in the partner sidebar to offer the stamp card, choose Wallet artwork and colors, and download a safe sample. The Apple pass links to current stamp progress instead of printing a total that could become stale. See Business controls and pass design.
Tab 2: Rules
The mechanics of stamp collection: limits, thresholds, and expiry.
Stamps required
Required: Yes Options: 5, 6, 8, 9, 10, or 12 stamps Default: 10
How many stamps customers must collect to complete the card. The six options are curated so the stamp grid always renders balanced:
| Option | Grid layout |
|---|---|
| 5 stamps | 5×1 row |
| 6 stamps | 3×2 grid |
| 8 stamps | 4×2 grid |
| 9 stamps | 3×3 grid |
| 10 stamps | 5×2 grid |
| 12 stamps | 4×3 grid |
Example: Choose 10 for a classic "buy 10, get 1 free" program.
Stamps per purchase
Required: Yes Range: 1-10 Default: 1
Stamps awarded for each qualifying purchase. This is the default the add-stamp form suggests to staff.
Max stamps per day
Required: No Range: 1-100
Daily earning limit per member. Leave empty for unlimited. The limit resets at midnight in the installation's timezone.
When to use: prevent abuse, or slow down completion for longer engagement.
Max per transaction
Required: No Range: 1-50
Maximum stamps staff can award in one transaction. Leave empty for unlimited. Staff get a stamp-count selector on the add-stamp page whenever they can award more than one stamp. With a limit set, the selector runs from 1 to that limit. Left empty, it runs from 1 to the stamps a reward needs. A limit of 1 keeps the count fixed at the stamps-per-purchase amount.
Minimum purchase
Required: No Format: Amount in your currency
The minimum transaction value required to earn stamps. The minimum is a gate, not a multiplier: purchases below it earn nothing, and purchases above it do not earn extra stamps on their own. When set, staff must enter a qualifying purchase amount before they can add a stamp.
Stamps expire after
Required: No Range: 1-365 days
Days until collected stamps expire from inactivity. Leave empty for no expiration. The window is rolling: every stamp the member earns restarts the countdown. When it runs out, the system clears the member's current stamps (earned rewards and history stay). Members see the rule on their card's Terms tab.
Tab 3: Rewards
What members receive when they complete the card. Every completion adds one pending reward to the member's card; pending rewards accumulate until claimed.
Reward value and Currency
Required: No
The monetary value of the reward. Members only see it when Show reward value to members (Details tab) is enabled; staff then see it on the claim page too. Also useful for your own value math even when hidden.
Also reward points
Required: No
Bonus loyalty points credited automatically at completion. These fields appear when your account includes loyalty cards.
Credit points to card is required as soon as you enter points: choose the loyalty card that receives them. The system credits points the moment the card completes, with no staff action.
Requires physical reward claim
Default: Disabled
Enable when the reward is something staff hand over at the counter. The member gets a Collect reward button and shows its QR code; a staff member confirms the handover on the claim page. Leave disabled when the completion reward is points only.
Reward title
Required: Yes Character limit: 128 Translatable: Yes
Give the reward a clear name.
Examples:
- "Free Large Coffee"
- "50% Off Next Service"
Reward description
Required: No Character limit: 250 Translatable: Yes
Details about the reward: what's included and any restrictions.
Tab 4: Content
Customer-facing copy. Both fields support multiple languages; add translations to reach international customers.
Title
Required: Yes Character limit: 128
The public program name customers see.
Examples:
- "Coffee Rewards"
- "Buy 10, Get 1 Free"
Description
Required: Yes Character limit: 250
The main message shown on the card. Lead with the benefit and keep it short.
Example: "Collect 10 stamps and get your next large coffee free! Earn one stamp with every coffee purchase of $3 or more."
Tab 5: Design
The visual presentation. A live preview shows your card as you design.
Background color and opacity
Background color default: #047857
Background color opacity default: 75 (range 0-100)
The card's base color. When you add a background image, the color lies over it at the chosen opacity, so a lower value shows more of the image.
Text color
Default: #FFFFFF
The color of text on the card face. Keep strong contrast with your background.
Stamp icon
Required: Yes Default: ⭐
The symbol shown on each stamp. The picker organizes icons into six categories: Popular, Food, Retail, Services, Rewards, and Emojis, with search across all of them.
The stamps themselves render as frosted glass over your card design, so there are no stamp colors to configure.
Background image
Required: No Format: JPEG, PNG, JPG, or GIF Size limit: 20 MiB, subject to lower hosting limits Dimensions: 320×240 minimum, 1920×1440 maximum
An optional photo or texture behind the card content.
Logo
Required: No Format: JPEG, PNG, JPG, or GIF Size limit: 20 MiB, subject to lower hosting limits Dimensions: 20×20 minimum, 800×800 maximum
Your business or program logo. Square images display best.
See Designing Your Cards for design guidance in depth.
Saving your stamp card
Click Create. The form validates all tabs before saving:
Common validation errors:
- Club, Name, Title, Description, and Reward title are required
- Stamps required must be one of 5, 6, 8, 9, 10, or 12
- Credit points to card is required when you enter reward points
- Images outside the size or dimension limits are rejected
Fix any highlighted fields and save again.
After creation
Open View to inspect Details, Rules, Rewards, Content, Design and History. Select a displayed background or logo to open its full image.
Once saved:
- Program is saved: The list shows its status, with a completion card and a Brand the QR code action that opens the QR studio
- Customers can enroll: The first eligible stamp enrolls them; homepage visibility controls discovery
- Staff can award stamps: Scanning and manual entry work when the program is active and within its dates
- Counters start tracking: Stamps issued, completions, redemptions, and views accumulate per card
The stamp cards list keeps the program name, status and QR code visible on phones. Select Details for secondary statistics and information. Show all columns reveals secondary columns on narrower table views.
Testing your program
Before you promote it to everyone:
- Create a test enrollment: Use a test customer account
- Award stamps: Have staff practice scanning
- Complete the card: Confirm the reward appears and extra stamps carry over
- Verify rewards: Check that points credit and the physical claim flow works
- Check appearance: View on mobile and desktop
Printing your QR code
Members join by scanning the card's QR code. Open the QR studio (from the completion card after saving, or via the list's QR column) to brand and print it, then place it where people pay. See the QR studio guide.
Next steps
- Configuring Rewards: Reward options in depth
- Designing Your Cards: Visual customization tips
- Monitoring Performance: Track program success