Adding stamps.
Scan a customer's QR code or find them by name or email to add stamps
Adding a stamp is the core counter action for stamp cards. Scan the customer's QR code when you can, find them by name or email when you can't. Both paths land on the same Add stamp page.
The scan path
Step-by-step
- Customer completes purchase. Ring up the sale as normal
- Ask about stamps. "Are you collecting stamps with us?"
- Customer opens their QR code. Their stamp card shows it
- Scan the code. Open Scan QR from the staff bottom bar or sidebar; the camera starts on its own
- Verify details. The customer's name and stamp card appear
- Tap "Add stamp". Confirm the addition
- Success message. You and the customer both see the update; their open wallet updates on its own
Total time: 3-5 seconds. The customer's QR code is a stable link to their card, so there is no rush and nothing to refresh.
Three ways to scan
- Built-in scanner. Scan QR in the staff portal opens a full-screen camera scanner
- Hardware scanner. A USB or Bluetooth scanner works on any staff page; it types like a keyboard and the browser goes straight to the customer's card. See Scanning QR codes for hardware guidance shared by every program type
- Paste or type. When a camera is not available, the scanner page also accepts a pasted card link or the customer's typed identifier
Camera positioning
Best setup:
- Hold your device 6-12 inches from the customer's screen
- The QR code should fill about half of your camera view
- Keep both devices steady
- Ensure good lighting
Solutions for poor lighting:
- Ask the customer to raise their screen brightness
- Adjust your angle to avoid glare
- Move to a better-lit spot
- Fall back to the manual path below
The Add stamp page
Scanning (or opening the customer's card by hand) lands on the Add stamp page. It shows:
- A compact customer card at the top so you can confirm you have the right person
- A stamp progress bar with the current count and the target (for example, 4 / 10), plus a "Reward ready" notice when a completed card waits to be claimed
- A purchase amount field. Optional for most cards, required when the program sets a minimum spend
- A stamps to award selector, shown when the program lets staff award more than one stamp per visit. It runs up to the per-transaction limit, or up to the stamps a reward needs when the program sets no limit. You choose the count; the amount never calculates stamps
- A collapsible Stamp card rules panel with the program's full rules
- A collapsible Add a photo or note panel for an optional receipt photo and an internal note (up to 500 characters)
- The Add stamp button
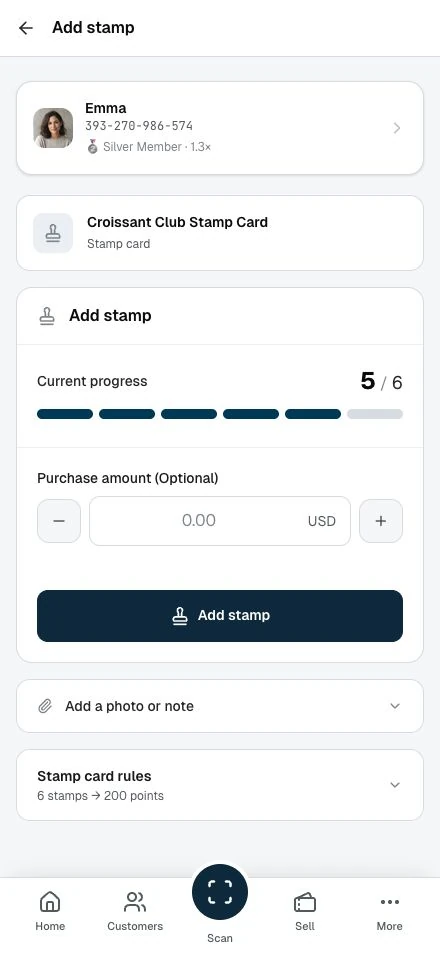
Before tapping Add stamp, confirm:
- The name on screen matches the customer in front of you
- It is the right program, if the business runs several
- Their current count, so you can mention it
Eligibility
The page checks the program's rules for you:
- Minimum purchase met, when the card sets one
- Daily limit not yet reached, when the card sets one
- Program active and within its dates
If something blocks the stamp, an amber notice explains why, and the server refuses the entry if you submit it anyway. A completed card never blocks earning: the card starts its next round at completion, extra stamps carry over, and rewards queue up until claimed.
Common messages:
"Minimum purchase amount not met"
- The purchase is below the card's minimum; mention the threshold for next time
"Daily stamp limit reached"
- The customer already earned today's maximum; the limit resets at midnight (the installation's timezone)
"This stamp card has expired"
- The program's end date passed, so earning and reward claims stopped. The member can still view the record in History
Optional fields
Purchase amount is for the record (and the rules check). Customers never see it. Skip it in a rush when the card has no minimum.
Notes hold context: "Birthday bonus", "QR wouldn't scan", "First visit". Customers never see notes. Keep them brief, factual, and professional.
The manual path
When scanning is not possible (no phone, dead battery, camera trouble), find the customer by name or email.
- Open Recent customers in the staff portal, or search the Customers tab by name or email
- Open the customer, then their stamp card
- Tap "Add stamp" on the card's page
- The same Add stamp page opens, pre-filled
What search can and cannot do: staff search matches the customer's name or email. Results show the email masked for privacy, and there is no phone lookup. When several customers share a name, confirm with the masked email's visible characters or their recent activity. Your list covers customers who have interacted with your club; a brand-new customer appears after their first scan or stamp.
New customers without the app: point them at your join QR instead. Scanning it creates their account in a few seconds, and their first stamp lands right after. Staff never create member accounts by hand.
Typical timing: the scan path takes seconds; the manual path 30-60 seconds once you know it.
Undoing your own recent stamp
If you added a stamp twice or to the wrong person, open History from the result screen or the stamp card on the customer overview. Tap Undo recent stamp and confirm.
- You can reverse your own most recent stamp, never a colleague's
- You see the original entry beside its reversal
- You can undo each stamp once
For a colleague's latest entry, ask the business owner to review the transaction history. Older or multiple corrections need administrator review. Do not repeat a correction that already has a reversal.
Communication that works
Before: "I'll add a stamp to your card right now."
After: "You have 6 of 10 stamps. Four more stamps earn your reward."
If not eligible: "It looks like you've reached today's limit, but you can earn more tomorrow!"
During rush hours: have the scanner ready, scan while you prepare the order, skip the optional fields, confirm out loud, move on.
Never:
- Add stamps without the customer present
- Add stamps for friends or family
- Work around a rule the page enforces
- Scan your own code
Troubleshooting
QR code won't scan
- Check their screen. All of it visible? Brightness up? Screen cracked?
- Check your camera. Lens clean? Focused? Permission granted?
- Adjust position. Closer, farther, different angle, better light
- Go manual. Find them by name or email and add the stamp from their card
Wrong customer scanned
If you have not tapped Add stamp yet: go back, ask the right customer to show their code, scan again.
If the stamp is already added: tap Undo recent stamp on the history you land on, then add the stamp to the right customer.
Duplicate scans
Wait for the success message before scanning again. If a duplicate lands anyway, undo your recent stamp and apologize; the record keeps both the entry and its reversal, so nothing is lost.
"Customer not found"
- Ask them to spell their name
- Check Recent customers if they visited before
- A customer who has never interacted with your club will not be in your list yet; use the join QR
Training tips
Before your first shift: practice scanning with a test account, in different light, until the flow is muscle memory.
During training: shadow experienced staff, watch a few manual lookups, and try both paths under supervision.
Common mistakes:
- Scanning without checking the name. Verify every time
- Silent service. Say what you are doing and confirm the new count
- Giving up on the scanner too fast. Two adjustments often fix it
- Forcing an ineligible stamp. The rules are the program's promise to every customer
Next steps
- Processing rewards: Handle reward claims at the counter
- Viewing history: Check a customer's stamp record
- Troubleshooting: Device and system issues