Connecting your Shopify store.
Step-by-step guide to linking your Shopify store to your loyalty program.
Early access: Behavior may change. Test the connection and a paid order in a test store before using it for customers.
Connect Shopify to award loyalty points for paid orders using the selected loyalty card's earning rules.
Before you begin
You'll need:
- The administrator has enabled Shopify under Settings → Integrations and saved
- The installation operator has configured the Shopify app credentials and callback URL; see Server configuration
- At least one active loyalty card
- Your Shopify store subdomain (e.g.,
my-storefrommy-store.myshopify.com) - Owner or staff access to your Shopify admin
Connecting your Shopify store
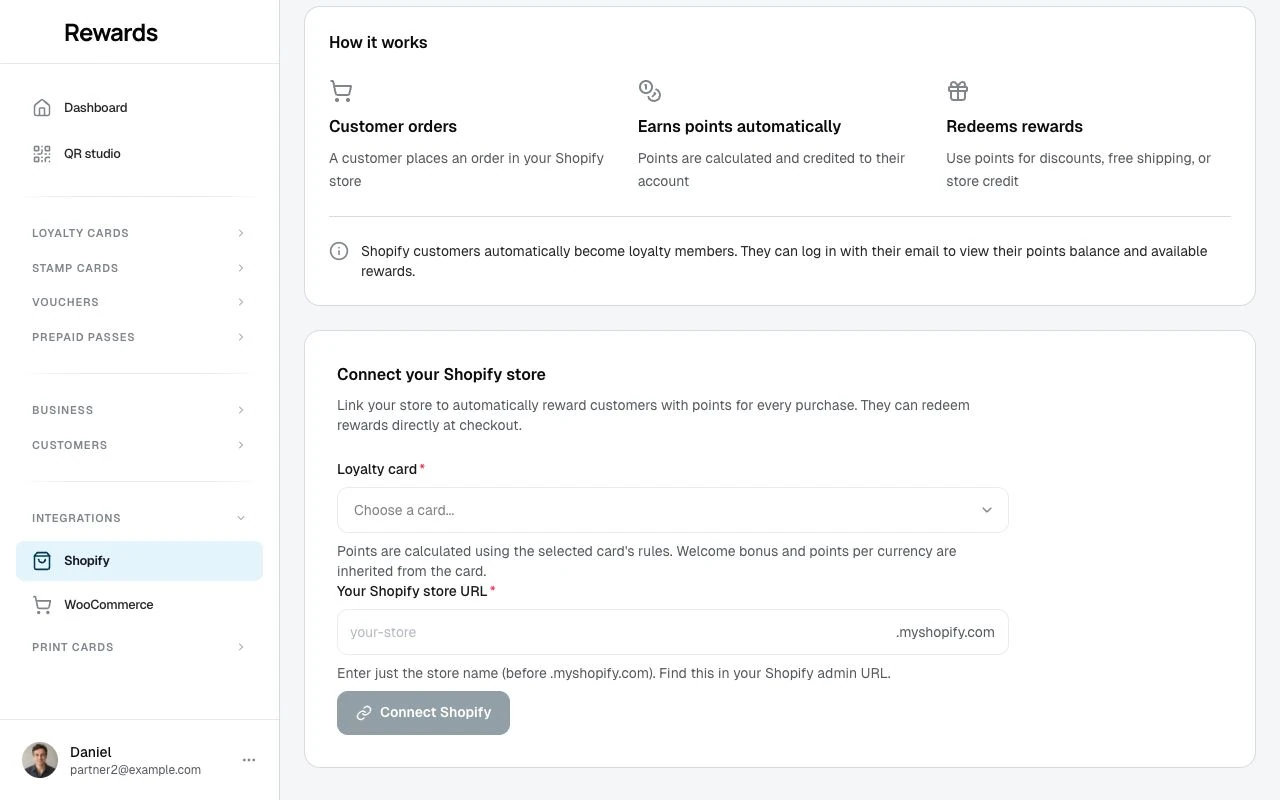
- Navigate to Integrations → Shopify in the partner sidebar
- Select the club that owns the loyalty card, if the club selector appears
- Select a Loyalty Card from the dropdown. This card's rules determine how points are earned
- Enter your Shopify Store URL. Only the subdomain (e.g.,
my-awesome-store) - Click Connect Store
- You'll be redirected to Shopify's authorization page
- Review the permissions and click Install app
- You'll be redirected back to your integration dashboard
Once complete, you'll see the connected dashboard with your Shopify store status, linked card, and available tabs.
What happens during connection
When you authorize the Shopify integration:
| Step | What Happens |
|---|---|
| OAuth Authorization | Secure token exchange with Shopify |
| Webhook Registration | Shopify notifies us of orders and refunds |
| Widget Configuration | Public API key generated for storefront widget |
| Status Activation | Integration becomes active and starts processing |
Your Shopify integration is now live and ready to process orders.
Understanding the dashboard
After connecting, your dashboard shows three tabs:
Overview tab
Displays connection status and key information:
| Detail | Information |
|---|---|
| Store | Your connected store domain |
| Loyalty Card | Which card is earning points |
| Connected | When you first connected |
| Recent activity | Where the webhook events come from; open Activity to read them |
Expand Widget embed code to see your generated storefront snippet, the Copy code button, and installation steps. See Shopify Widget Installation for the full walkthrough.
The Connection management section sits below the connection details and provides controls:
- Status Badge: Green "Receiving webhooks" when active, amber when paused
- Pause Button: Stop processing without disconnecting (webhooks are logged but not processed)
- Disconnect Button: Remove the connection
Settings tab
Configure widget appearance and point rules. See Shopify Settings & Point Rules for details.
Activity tab
Shows recent webhook events with processing status:
| Status | Meaning |
|---|---|
| Processed (green) | Order handled, points awarded |
| Ignored or skipped (neutral) | Valid webhook but no action needed (e.g., duplicate) |
| Failed (red) | Error occurred during processing |
Review this tab if customers report missing points.
Pausing your integration
To pause processing without disconnecting:
- Go to the Overview tab
- Find the Connection management section
- Click Pause
While paused:
- Webhooks are logged but not processed
- No points are awarded for new orders
- The widget cannot load program data
- You can resume anytime
To resume: Click Resume in the same section. New deliveries can process again. Resume does not backfill orders skipped while paused.
Disconnecting your store
If you no longer want the integration:
- Go to the Overview tab
- Click Disconnect in the Connection Management card
- A confirmation modal appears
- Type
DISCONNECTto confirm - Click Disconnect
After disconnecting:
- Webhooks stop being processed
- The widget stops working on your storefront
- Existing member points remain unchanged
- You can reconnect the same store later (creates a new integration)
💡 Tip: Consider pausing instead of disconnecting if you might want to resume later.
Demo mode
A demonstration installation can include a labelled, read-only demo connection with sample activity. It has no real store credentials. Connection controls and settings cannot be saved, and the preview does not change points or create coupons. The Demo connection notice identifies this state; it does not verify production OAuth or order processing. Use a separate demonstration installation, as described under Server configuration.
Troubleshooting
"Store URL is required"
Cause: You clicked Connect without entering your Shopify store subdomain.
Solution: Enter your Shopify store's subdomain (e.g., my-store, not the full URL).
"Please select a loyalty card"
Cause: No card was selected before connecting.
Solution: Choose an active loyalty card from the dropdown. If none appear, create a card first.
"This store is already connected"
Cause: This Shopify store is already linked to a loyalty program (yours or another).
Solution: Disconnect the existing integration first, or use a different Shopify store.
"Connection failed - please try again"
Cause: The Shopify OAuth flow was interrupted or timed out.
Solution:
- Ensure pop-ups aren't blocked in your browser
- Check that you have owner or staff access to the Shopify store
- Try again from the beginning
- Clear your browser cache if issues persist
App doesn't appear in Shopify admin
Cause: Authorization may not have completed.
Solution:
- Disconnect from the loyalty dashboard
- Reconnect and complete the full Shopify authorization flow
- Ensure you clicked "Install app" on the Shopify authorization page
Next steps
Once connected:
- Install the storefront widget so your store shows the loyalty program
- Configure your settings to customize the experience
- Make a test purchase to verify points are awarded
Server configuration
The installation operator completes this setup before partners connect stores:
- Configure a Shopify app for the stores you will connect. Copy its client ID and client secret into the server's
.envfile. - Set
SHOPIFY_APP_URLto the public HTTPS base URL of this installation, without a trailing slash. It defaults toAPP_URLif omitted. - Register that base URL plus
/shopify/callbackas an allowed OAuth redirect URL in the Shopify app. For the example below, usehttps://loyalty.example.com/shopify/callback. This callback has no locale prefix. - Keep the client secret on the server. Do not place it in a widget, theme, screenshot, or shared document.
SHOPIFY_CLIENT_ID=your-shopify-app-client-id
SHOPIFY_CLIENT_SECRET=your-shopify-app-client-secret
SHOPIFY_APP_URL=https://loyalty.example.com
The default requested scopes are read_customers,read_orders,write_discounts. SHOPIFY_SCOPES can override them; keep the Shopify app configuration consistent with the permissions the integration needs. The feature switch does not configure these credentials.
After changing .env, run php artisan config:clear. Enable Shopify in Settings → Integrations and save. The optional FEATURE_SHOPIFY=true environment value sets the default; a saved dashboard setting takes precedence.
For a separate demonstration installation only, APP_DEMO=true enables simulated connections. Use APP_DEMO=false for production.
Related topics
- Shopify Widget Installation: Add the widget to your Shopify theme
- Shopify Settings: Configure point rules and appearance
- Creating Loyalty cards: Set up your loyalty program
- Understanding Clubs: Organize your business structure