Administration overview.
What an administrator runs: the people, the businesses, and the installation, with settings, billing, and health each in their own guide.
The admin dashboard is your control center for managing the entire platform. Access it at /admin on your domain.
Settings, billing, and system health each have their own guide. This page covers the work that is the administrator's alone: the people, the businesses, and the daily operator tasks. It points you to the rest as you need it.
Administrators have full system access. They manage the platform itself, not just individual loyalty programs.
- Sign in at
/adminand read the dashboard: partners, members, activity, and the accounts that need attention. - Create a network if you group businesses by region, brand, or district. Skip it for a single business.
- Create a partner, or open self-registration, and set what each plan allows.
- Give the installation its identity in Platform settings and branding: name, logo, languages, and email.
- Decide how partners are billed in Plans and billing, or leave it on manual.
- Bring Health center checks to green and prove that a backup restores.
The dashboard
When you sign in, the dashboard gives you the platform at a glance:
- Headline numbers for partners, members, and activity, each with its recent trend
- A chart of the last seven days
- The open support tickets
- The accounts that need attention
- The newest partners to join
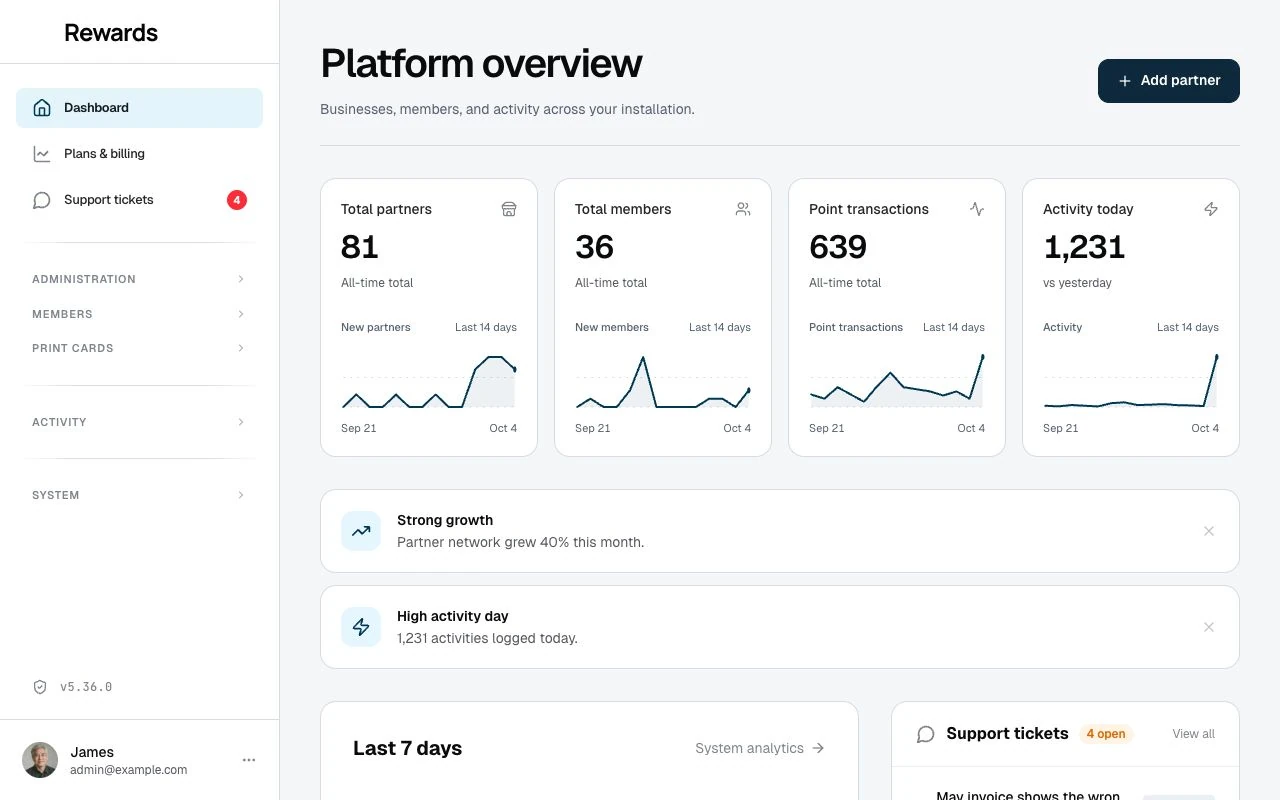
Managers see a focused version with the partners and support work their role covers.
Who does what
The platform uses a hierarchical structure:
graph TD
    A["Administrator"] --> B["Manager (optional)"]
    B --> C["Partner"]
    C --> D["Staff"]
    D --> E["Member (Customer)"]
Administrators have full access. Managers operate within their assigned network only. Partners manage their own loyalty programs. Staff process customer transactions. Members collect cards and earn rewards.
See User roles for the full permission map.
The people and businesses you manage
Networks
Networks group managers and partners for organizational reasons: geographic regions, brands or franchises, client groups, or business districts. The Networks list shows the partner count, including inactive partners, and starts with the primary network, then names in alphabetical order. Column sorting overrides that order. See Networks.
Managers
Managers are administrators with a limited scope. They create partners in their assigned networks and view those networks' data, but cannot reach other networks or the installation settings. The Administrators list shows each person's role, networks, active state and last login. On phones, Details reveals network names and email. See Managers.
Partners
You create partner accounts, assign them to networks, edit any of them, and set their feature access and limits. See Partner permissions and limits.
The Partners list, recent business panels on the dashboard, and Plans & billing show the business logo, then the owner's photo if no logo exists, or the business's initials if neither image exists.
The Partners list starts with Business, Plan and Status, with its account-opening action. On phones, Details shows Contact and Network; Show all columns reveals secondary columns on narrower table views. Business uses the saved business name, with the account holder's name as its fallback. Contact shows the account holder and account email for operator work; this does not publish private details on member pages. Open the business row to edit its account. Search matches the business name and account identity.
Opening a partner account (impersonation)
Each row in the partners list carries a Log in to account key. Select it to open that business in the partner app and see what it sees, which helps you answer a support question or check a setup.
While you are in a partner account, an operator bar sits pinned to the top of the content area on every partner page. It carries an amber Admin session badge, names the business and your admin name (for example, "Prime Deli · via James"), and holds one control: Return to admin. The bar rests on its own surface, light in light mode and dark in dark mode, so you always know you are looking at a partner as an operator, not as the partner. Partners and members never see this bar; it appears only during your session.
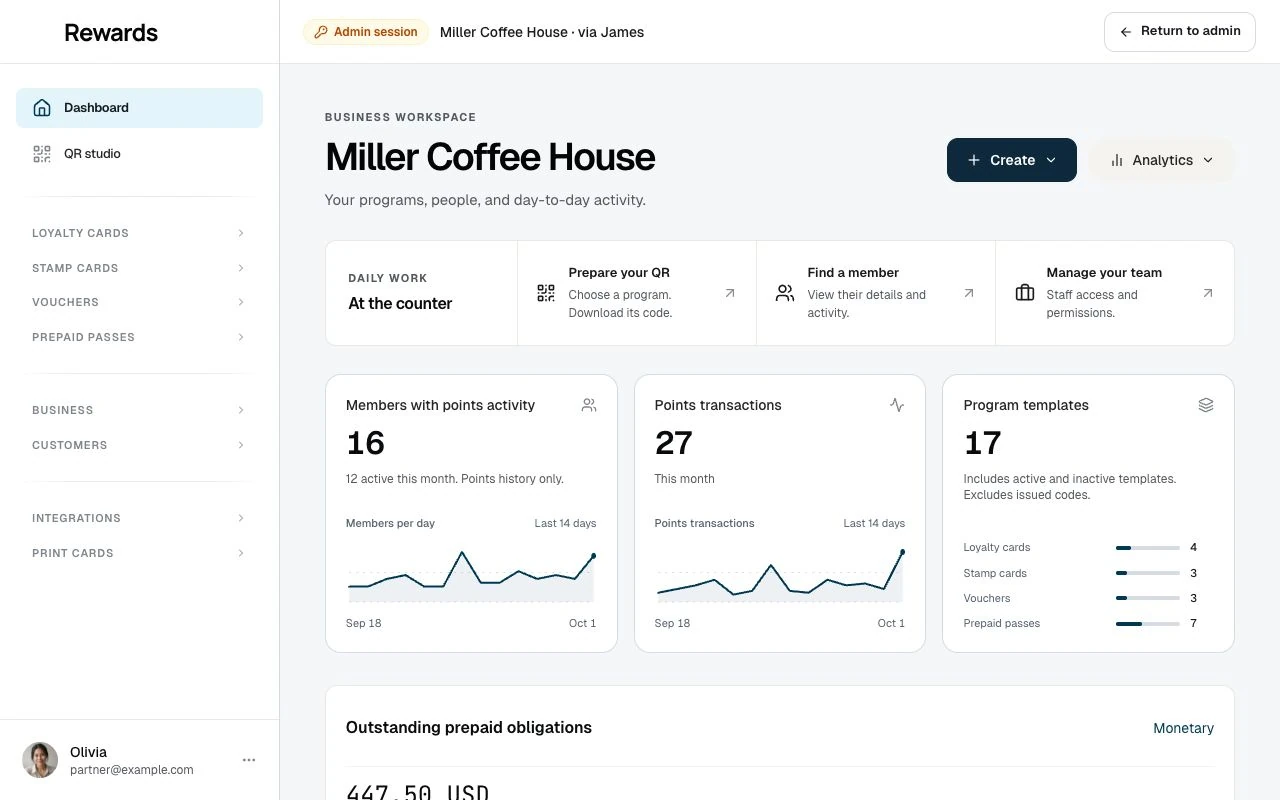
To leave, select Return to admin. You land back on the partners list, and your admin session is where you left it. Signing out from inside the partner account does the same thing, so you never get stranded on the partner login. If you had your own separate partner login open before you started, that session returns to you when you leave.
Deleting a business
In Admin → Partners, select the business's delete action. Review the confirmation: it counts the affected members, staff, clubs, programs, transactions, achievements, and uploaded images. Select the acknowledgement checkbox to enable the delete button.
Deleting a business removes its staff, programs, and member history at that business. Member accounts stay on the platform and can still use other businesses. This action has no undo, so export any records you need before you confirm.
Viewing a member
Point, stamp, voucher, and pass transaction lists start with Partner, showing the business name, followed by the program, event or status, member, amounts, and date. They show the latest activity first. Use Filters → Partner to search for and select one or more businesses; exports follow the same selection. Businesses that share a name have distinct choices with short references.
Transaction detail titles use Business name · Program name · Event. Member overviews and program histories start their breadcrumbs with the home icon.
Members start with the latest qualifying activity across the programs a full administrator can oversee, including monetary issuance and spending. Members without activity stay visible after those with activity. Use Sort → Newest first or Name (A-Z) for another order. Last activity restores the default.
Open Members → Members and select a member row. Their overview brings together loyalty cards, stamp cards, vouchers, visit passes, monetary credit, and earned achievements across businesses. Each program identifies its business and shows its own balance or progress. Currency balances stay separate.
Select Edit on the overview to change the member's account. The pencil in the list opens the same form without opening the overview first. Program buttons and row actions keep their own destinations. On phones, Details shows secondary member information; the member identity, tier, programs and account-opening action stay visible when available.
To inspect one program, select its card in the list or its Transaction history link on the overview. Use +N to see further programs. Histories include the member in their breadcrumbs and an Overview link; the Members navigation stays open and active. Available Delete last actions open a confirmation dialog with the member, program, and effect before you submit.
Monetary passes open a credit history, including retained accounts whose wallet pass no longer exists. View record opens the account's servicing controls. See Monetary oversight and retention.
The overview's Achievements section shows earned milestones, their dates, and reward states, six per page. View all opens the full achievement audit record, including voided entries and the authorized Void action. See Voiding a fraudulent achievement.
The platform-wide member overview and editing controls require a full administrator account. Network managers retain their existing scope.
Keeping member records clean
When you turn on anonymous mode, every unique visitor creates a member account. Over time you can end up with thousands of inactive accounts from one-time visitors who never used any program.
To remove unused anonymous accounts:
- Go to Members in the admin sidebar.
- Select Purge ghost members.
- Choose a retention period: 1, 3, 6, 12 or 24 months. Each option shows its deletion count. The default is 6 months.
- Review Members to purge, the cutoff date and Member breakdown.
- Select Purge and confirm Delete. Select Cancel to leave the accounts in place.
The purge removes anonymous accounts created before the cutoff date that have no email, no recorded interaction and no prepaid pass records. Accounts created at or after the cutoff stay.
Registered members and members with recorded activity stay. Issued prepaid passes, pass transaction records and retained monetary accounts also protect a member when their interaction date is missing. This includes expired visit passes and monetary accounts whose wallet pass no longer exists. The purge does not alter their balances or financial history.
The page shows an empty state when no accounts qualify. It checks eligibility again when you confirm deletion.
The Activity logs record every purge for audit. To trim the logs themselves, see Managing activity log size.
For scoped exports of transaction, stamp, and voucher history, see Data export.
Where the rest of the operator work lives
Use these guides for installation settings and maintenance:
- Platform settings and branding: Branding, the homepage and public business listings, languages, email, cookie consent, and installation-wide settings.
- Plans and billing: Plans, manual, Stripe, and PayPal billing, and the Plans & billing dashboard.
- System health and security: Health center diagnostics, security monitoring, and session locking.
Related topics
- Managers: managing manager accounts
- Partner permissions and limits: control feature access and limits
- Support tickets: the questions partners send you
- Data export: transaction, stamp, and voucher history export
- Platform settings and branding: installation configuration
- Plans and billing: partner subscriptions and billing
- System health and security: diagnostics, monitoring, and locking