Partner Card studio.
Why printed member cards work as a marketing tool, how to design and issue them, how to measure what comes back, and how to run a print job from test batch to full run.
The Card studio is where a business designs its own member card and issues the codes for it. You reach it from Print cards → Card studio in the partner sidebar. It appears when your plan includes member cards; your administrator turns the feature on and sets how many codes you may issue. See Admin setup for the plan side.
The live preview and the card's material, colours, and logo share one panel. The editing workbench sits alongside it and has three tabs: Front and Back carry each face's own fields, and Issue mints the codes. Choosing Front or Back flips the preview to that face, so you always see the side you are shaping. The studio has no export tab: the moment you generate cards, it takes you to that batch's own page, where every print and download tool lives next to the cards it prints (see Card batches).
Why print cards
A printed member card is a marketing tool you can hold. You can leave a stack by the register, drop one in every bag, or mail one with an offer. The card does what a flyer cannot: it reports back.
Every card carries a code that exists before anyone claims it. Handing cards out is safe, because a blank card means nothing until a customer scans it and links it to their account. That link is your measurement. A flyer disappears into the world and you never learn what it did. A card that reaches a wallet shows up in your batch numbers the same day.
What a printed card buys you:
- A bridge from the street to your programs. One scan takes a person from your counter, your market stand, or a gift bag into your loyalty programs, with an account created on the spot if they are new.
- Proof of uptake. Each batch shows how many of its cards customers linked, so you know which stack, which event, and which location worked.
- Recognition at every visit. A claimed card identifies the customer at the counter from then on. Staff scan, swipe, or type it, whatever the customer presents.
- A better object than paper. A card reads as something to keep. A card with your logo on a clean white face reads as something worth keeping.
Occasions
Cards fit anywhere you meet customers in person. Label each batch after the occasion, and the batch page tells you afterwards what each occasion earned you (see Measure what comes back).
- An opening or a launch. Print a batch labelled after the event and hand a card to everyone at the door.
- A market, fair, or trade show. One labelled batch per stand or per stop, so you can compare cities and dates after the season.
- The counter stack. An evergreen batch by the register. Staff hand one to any customer who is interested; refill when the blanks run low.
- A hotel or venue desk. Cards at reception; guests link before they check out.
- Gift bags and parcels. Drop a card in every bag or shipment. The batch tells you how many boxes turned into members.
- A VIP gesture. Issue one card pre-linked to a known customer and hand it over ready to use. No claiming needed; it identifies them from the first visit.
- A win-back mailing. Mail a card to customers you have not seen in a while. Pair it with a voucher so the card is worth the trip.
- A replacement. A customer reports a card lost, and you hand them a fresh blank from the counter stack. The old card stays dead; the new one links on their first scan.
Measure what comes back
The batch label is your measurement handle. Give every occasion, location, or print run its own label when you issue. Two runs with the same label extend one batch, so a new occasion gets a new label.
Card batches in the dashboard then shows, per batch: the total, how many cards are still blank, how many are linked to members, how many are disabled, the linked percentage, and the created and last-linked dates. Read them like this:
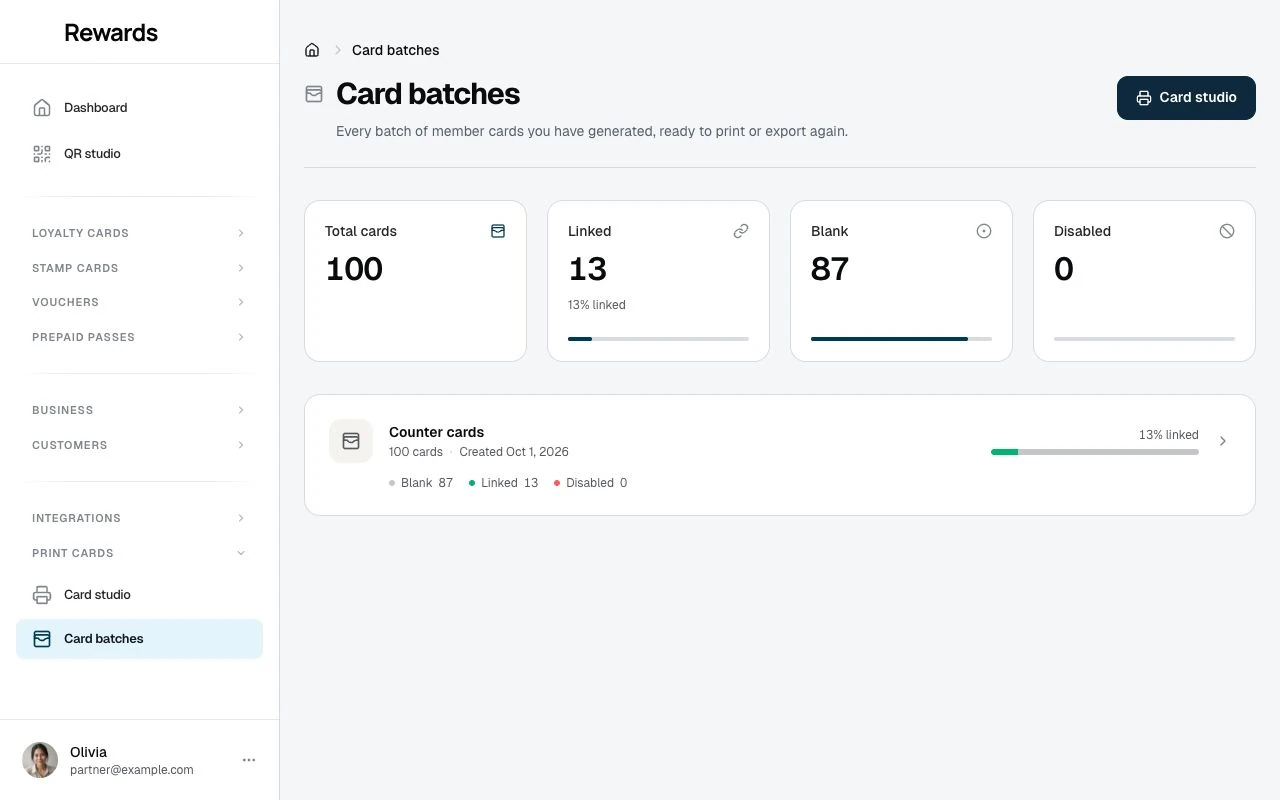
- Linked percentage is uptake. It counts the cards that reached a wallet. A counter stack at 40% linked is working; an event batch at 2% tells you the handout, the placement, or the offer needs another look.
- Blank is remaining reach. Blanks are cards still waiting to be handed out or still sitting in drawers. A batch that stops linking with many blanks left means the stack stalled, and the last-linked date shows when.
- Disabled is lifecycle. Lost and retired cards. A rising disabled count on an old batch is normal wear.
Linked cards, the members behind them, and the statistics never leave. Delete blank cards removes the unclaimed remainder of a batch when you misprinted or overshot, and nothing else. Deleting a linked card is not offered anywhere, because a linked card is a customer.
Design the card
The card is a standard CR80 card (the size of a bank card), shown as a live front and back preview that updates as you work. A new card is a white business card with near-black text. Colour it only if you want to. The controls:
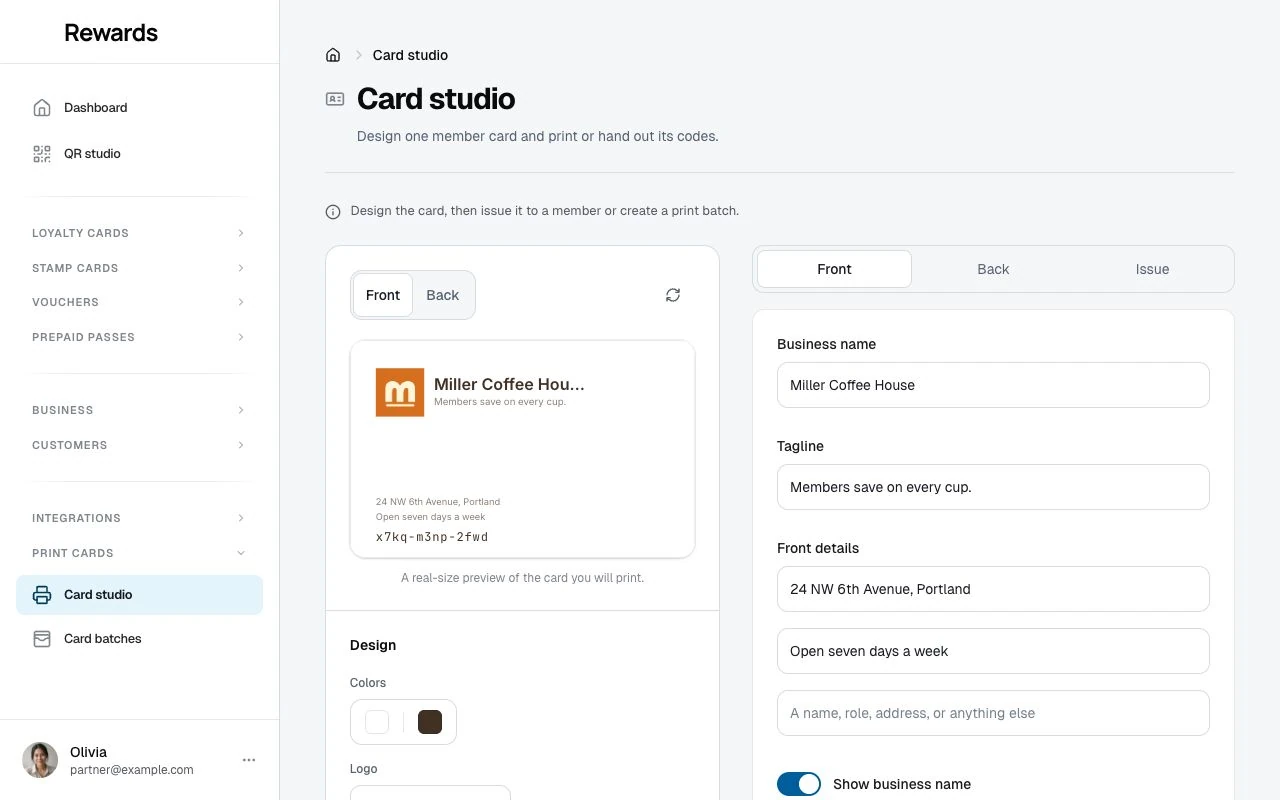
- Card colour. The card's background, on both faces. It starts white, so a card looks like a clean business card until you decide otherwise.
- Text colour. The colour of the name, tagline, details, and code, on both faces. It starts near-black. The QR and barcode are never tinted; they sit on their own white patches so a scanner reads them whatever colour the card is. The studio warns you when the text and card colours sit too close to read.
- Logo. Your logo on the front. The card lays it out to fit its shape: a square or tall logo sits beside the business name like a business-card header, while a wide logo runs as a banner across the top with the name below it. A Logo size slider scales it, and the size flows to the preview and every export.
- Business name. The title on the front. It starts as your business's own name and keeps what you type. Clear it and the front shows no name at all. That is how you make a logo-only card.
- Back title. The back's own heading. It starts from the business name and then edits on its own, so the back can carry a different heading than the front, or none.
- Tagline. A short line on the front, under the name.
- Front details. Up to three optional lines under the name on the front. They are yours: a person's name, a role, an address, opening hours, a slogan. Blank lines are dropped, so you can use one, two, or three.
- Name toggle. Show or hide the business name on the front.
- Back barcode toggle. Show a Code 128 barcode on the back, so a counter barcode reader can read the card without a QR.
- Magnetic-stripe toggle. Show a magnetic-stripe band on the back. This is a layout marker: it reserves and positions the stripe on the card art so a vendor lays plastic and encoding in the same place. The data a stripe encodes does not live in the art; it comes from the CSV export (see below).
- Back text. A free-text line on the back. Type anything you want printed there; it starts with the localized "Scan to link this card." copy, and the studio keeps what you type. Clear it and the back prints no line at all. Like the front title, empty means empty, and the default copy never comes back on its own. Clear the back title too and the back carries only the QR zone. The text sits in a block at the top of the back, under the back title, and wraps across the width of the card so a longer message reads well. Turning the barcode on does not shorten it; only the magnetic-stripe marker, which takes room off the top, trims it.
The front reads like a business card: the logo and name sit together at the top, the tagline and any details follow, and the card's code prints along the base like a card number. On the back, the title and back text form a block at the top, and the QR and barcode sit below on their own white patches so both scan. What you set is what the outputs carry, so the preview is the proof: design it once, and every card in the batch matches.
Issue codes
Issuing creates codes and files them under a batch. There are two modes:
- A batch of blank cards. Enter how many cards you want. The studio creates that many blank codes for members to claim later. Use this to print a stack of cards to hand out.
- One card, pre-linked to a member. Pick a member who is already visible to your business and issue a single card already linked to them. Use this to make a card for someone standing at your counter.
Either way, the studio then takes you to the batch's page. A single card lands as a batch of one. The label you give when issuing groups the codes into a batch, so two runs with the same label extend one batch.
Plan cap and the remaining count
Your plan caps how many codes your business may issue. The studio shows the remaining count against that cap. A batch that would go over the remaining allowance is rejected whole: no partial batch is created, and the studio shows how many codes you have left, so you can ask for a smaller batch or ask your administrator to raise the cap. Your My Plan page tracks the same cap as the Card studio customer invites meter under Resource usage.
The outputs
Every output below lives on the batch's own page. The studio lands you there the moment a batch is generated, and Card batches re-opens the same page any time after. The page lists the outputs as a set of rows, each naming what it is and what it is for. Print the cards yourself, or hand a vendor the files: the app produces the files, and a print shop or card vendor produces the plastic (see Hardware).
Print-shop PDF
One card per page, with the front and back on separate pages, so a duplex print produces a complete card. Each card is at exact trim size with 3 mm bleed and crop marks, ready for a print shop. This is the file to send when a shop prints and cuts your cards.
Vendor CSV
A CSV for a card vendor's variable-data printing and magstripe encoding, one row per card, with these columns:
| Column | What it holds |
|---|---|
code |
The card's code |
grouped_code |
The code formatted for a person to read |
claim_url |
The /c/{code} link a member opens to claim the card |
label |
A human label for the row |
magstripe_track1 |
The code in a Track 1 wrapper, %CODE?, uppercased |
A vendor uses code and claim_url to print the QR, barcode, and number per card, and magstripe_track1 to encode the stripe. The stripe band you toggled on in the design marks where the stripe sits; this column is the value that gets encoded.
8-up home sheet
A sheet of single-sided claim cards, eight to a page, for printing on an office printer. Use it when you want cards to hand out without going to a print shop.
NFC tag writer
A panel that writes each card's claim URL to its NFC tag, one tag at a time. Web NFC exists in Chrome on Android alone, so where it is available the panel walks the issued codes one tap at a time: you tap a tag, it writes a single NDEF URL record, and you move to the next. On other devices the panel shows the copyable link, points you to a standard NFC-writing app, and reminds you the CSV export carries every card's URL for bulk provisioning. See the hardware guide for tag choice.
Card image and vector
Card image (PNG) and Card vector (SVG) each save the face shown in the preview. The PNG is a flat image for a mockup or a one-off; the SVG is scalable art for a designer.
Copying a single card's claim link lives with the Write NFC tags tools, next to the guidance for writing tags by hand.
Your first print run, step by step
A print run is cheap to get right and annoying to get wrong, so walk it in this order:
- Design the card and issue a small test batch. Five cards labelled "Test run" is enough.
- Scan the test QR. The card preview on the batch's page is the batch's first card, live. Scan it with a phone and walk the claim journey a customer gets, from
/c/{code}to the email-first claim. If you claim it with a test account, that one card links, which is fine: it proves the loop and shows you what the batch numbers look like. - Proof the PDF. Open the print-shop PDF and check both faces of a few cards: the bleed and crop marks are there, the colours are yours, the code prints along the base, and nothing sits close to the trim edge.
- Pick the route. The office sheet covers a handout today. A print shop prints and cuts the PDF. A card vendor adds variable data, magstripe encoding, and NFC provisioning. Hardware explains who makes what.
- Send the files and ask for a sample. The PDF carries the design; the CSV carries the per-card data. Ask the vendor for one printed sample before the full run.
- Check the sample like a customer. The QR scans at arm's length under normal light. The code under it reads without squinting. The dark modules sit on a clean white patch with space around them. If you ordered a stripe, swipe it at your counter and watch the member resolve. If you ordered NFC, tap it and watch the claim page open.
- Approve and print the full run. Issue the real batch with its occasion label, send the same file pair, and clean up the test batch with Delete blank cards (your claimed test card stays, and that is correct: linked cards always stay).
- Hand the cards out and watch the batch page. The linked percentage tells you what came back.
Hand out blank cards, and how members claim them
A batch of blank cards works like this:
- Issue a batch and print the cards (the print-shop PDF for a shop, or the 8-up sheet at the office).
- Hand a card to a member.
- The member scans the card's QR or opens its link, which lands on
/c/{code}. - Claiming is email-first: the member signs in or creates an account, and the card links to their wallet. From then on it identifies them at your counter.
Staff never claim a card on a member's behalf; the member claims their own. A card already claimed by someone else, or one that has been disabled, does not resolve. See Using member cards for the member's side.
Card batches
Print cards → Card batches is the home of your print runs. Every batch you generate stays reachable there, long after the studio session that minted it, and the studio lands you there right after generating. The list shows each batch with its size, its creation date, and how far it has travelled: how many cards are still blank, how many are linked to members, how many are disabled, and the linked percentage. Cards issued without a batch label group under No label.
Open a batch and you get the export bench for those cards: the print-ready PDF, the card-codes CSV, the print sheet, the card image and vector, and the NFC tools. Reprinting a batch, sending it to a vendor, or writing a replacement tag never depends on keeping a browser tab open. Each code is listed with its status, so the batch page is also where you check on a single card. Before your first batch, the page points you to the Card studio to make one.
A batch can also be cleaned up: Delete blank cards removes the cards from that batch that no one has linked yet, and nothing else. Linked cards, the members behind them, and every statistic stay. A batch with members keeps living with its history, and a batch that was all blanks disappears from the list.
Testing the links
Every batch carries its own test QR: the card preview on a batch's page is the batch's first card, live. Scan the QR on it with any phone and you walk the exact claim journey a customer gets. The caption under the preview says so.
Every QR the platform shows also writes the URL it encodes to the browser's developer console, prefixed [QR]. This is a convention, not a leak: the QR is visible on screen anyway, so logging its target gives away nothing, and it turns testing a card into a copy-paste instead of a scan. A batch page goes one further and logs the whole batch's claim links as one list, so you can walk a fresh batch's /c/{code} URLs without touching a phone.
There is also a code-by-code Generated cards list behind the scenes. Day-to-day work does not need it, because Card batches carries the same cards with their exports, so it stays out of the navigation and keeps its address for direct-link testing. The list keeps Code first, followed by Status (blank, active or disabled). On phones, Details shows secondary labels, linked member information and the link date. Its scannable QR, Batch filter, permitted Disable action and safe Delete blank cards bulk remain available. Claimed and disabled cards are kept in every case; they hold history, so you disable a lost card rather than delete it. Disable is one-way: a disabled code stops working everywhere and cannot be turned back on, so you would issue a replacement instead.
The operator's view of the same surfaces is broader; see Admin setup.
Related topics
- Overview: The instrument and the carriers
- Using member cards: Claiming, the virtual code, and report lost
- Admin setup: The switch, the plan keys, and the operator studio
- Hardware: Stock, printing, encoding, and NFC tags