Partner registration.
How to create a partner account and verify your business email.
Becoming a partner lets you create loyalty programs for your business. Registration asks for your business name, email address, and legal consent, then verifies the email with a code.
Before you begin
To register as a partner, you need:
- A valid email address
- Your business name
- Agreement to the Terms of Use and Privacy Policy
Note: Partner registration must be enabled by the platform administrator in Settings → Onboarding → Partner Registration. The APP_PARTNERS_CAN_REGISTER environment variable serves as a fallback default when no database setting has been saved. At least one network must be marked as primary and active in Admin → Networks. This determines which network new partners are assigned to. If you don't see a registration option, contact the platform owner.
Finding the registration page
There are two ways to reach the partner registration page:
From the public homepage
When partner registration is on, the public homepage displays a Register Your Business link in the top navigation bar. Click this link to go straight to the registration page.
From the partner login page
- Go to the partner login page (
/partner) - Below the email field and Continue button, click Create one
Both paths lead to the same registration page.
The registration page
The registration page shows your Starting plan and its listed monthly price. Enter your business name and email, accept the terms, and verify your address. Registration has no plan picker or payment collection. After sign-in, open Business → My plan to compare the available plans.
Creating your account
On the registration page:
- Enter your business name
- Enter your email address
- Check I agree to the Terms of Use and Privacy Policy
- Click Create Account
The app then takes you to verify your email address.
Email verification
After creating your account:
- Check your email for a verification code
- Enter the 6-digit code in the verification screen
- The code submits on its own when complete
- That verifies your account and signs you in
If no code arrives: Click "Resend code" after 60 seconds. Check your spam folder if it still doesn't arrive.
After you verify
As soon as you verify your email, two emails go out:
- A welcome email to you. It lists your first setup steps (create a program, add your staff, share your QR code) and links straight to your dashboard. Replies go to the installation operator.
- A heads-up to the platform operator. They learn that you joined, so they can follow up with a personal welcome and a hand getting started.
Your installation's operator controls both emails in System settings, and both are on by default.
Your first Club
New partner accounts start with an active internal Club named Main (translated for the account creation language). Accounts created by an administrator or the Admin API receive the same starting Club. When you have one Club, program and staff forms select it automatically. With several Clubs, the choice remains visible.
Clubs organize your programs internally. Your business name identifies you to members; an internal Club name is not your merchant identity.
Your starting plan
New partner accounts receive the platform's default plan behind the scenes. The registration form does not ask the business to compare or choose plans.
The exact resource limits depend on the platform configuration. A typical default plan includes limits for:
- Loyalty cards
- Stamp cards
- Members
- Staff members
- Rewards
- Clubs
Open My Plan after signing in to see the exact limits and upgrade choices for the installation.
Plan configuration
The platform administrator sets plan names, prices, limits, and features in the Plans editor. As a partner, open My Plan to see the choices available to your business.
Pricing and minor units
The Plans editor accepts normal prices, such as 29.00. Administrators who manage prices through server settings can use the environment reference.
Registration does not collect payment. You start on the default plan. After registration, use My Plan to upgrade when online billing is available, or contact the platform administrator.
Understanding plans
The platform has four configurable plans. The administrator can rename them, set prices, and choose their features and limits. Open My plan to compare the plans available on your installation.
Upgrading your plan
How you upgrade depends on the platform's billing configuration:
Self-service (Stripe or PayPal)
If the platform uses Stripe or PayPal billing and you registered through the registration page, you upgrade from the My Plan page:
- Go to My Plan in the sidebar.
- Scroll to the plan comparison section.
- Click Upgrade on a higher-tier plan.
- Approve the payment: Stripe Checkout, or the PayPal approval screen.
- Your plan, limits, and features update once the payment confirms.
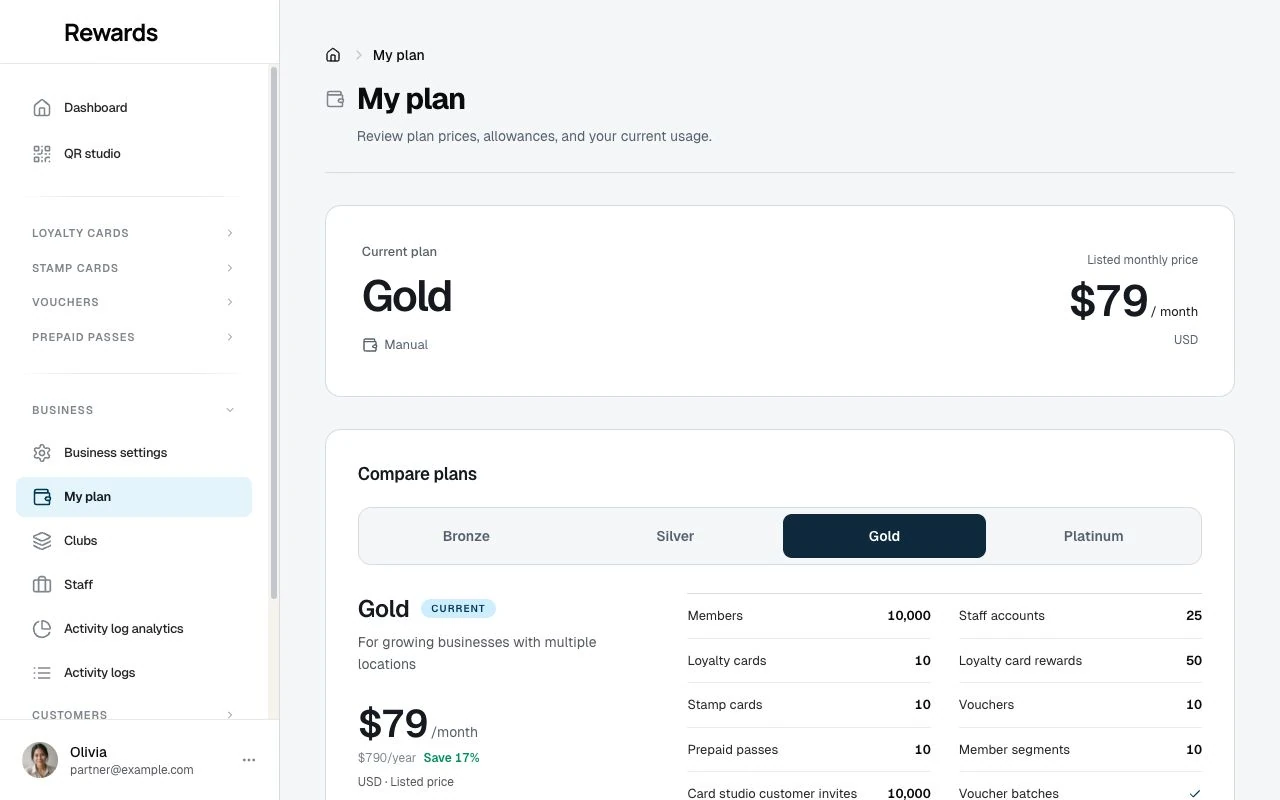
If you already have an active subscription, the button reads Change Plan. On Stripe, it opens the billing portal, which handles upgrades and downgrades. On PayPal, it confirms the change, cancels your current subscription, then sends you to PayPal to approve the new plan. PayPal also shows a Cancel Subscription control on the My Plan page.
Manual billing / admin-managed
If the platform uses manual billing, or if your account was created by an administrator:
- Contact your platform administrator to request a plan change
- The admin assigns your new plan tier via the partner management page
- Your resource limits and feature access update at once
Note: Selecting a new plan applies its permissions and limits in the admin form. The administrator can adjust those values before saving; the final values shown in the form become your account's permissions and limits.
After registration
Once you verify your account:
- The app signs you in to the partner dashboard
- Your starter plan is active
- You can start creating your first loyalty card
Next steps:
- Review your Main Club: Your account already has this internal group for programs and staff
- Create a loyalty card: Design your program
- Define rewards: Set what customers can earn
- Add staff: Enable your team to award points
Account security
Your partner account controls your business's loyalty program. Keep it secure:
Use a strong email password: Your email is your login credential. Protect it with a strong password and two-factor authentication.
Don't share login codes: Never give your verification codes to anyone.
Monitor activity: Check your activity logs often for unauthorized changes.
Verify account changes: Edit Account settings, select Continue to verification, request a code, and select Verify and save after entering it. Partner verification uses your current saved email address, including when changing that address.
Troubleshooting
"This email is already registered."
Someone already created an account with this address. Try:
- Signing in instead of registering
- Using a different email address
- Resetting your access if needed
"Please accept the terms to continue"
You must check the Terms of Use checkbox to create an account.
Registration link not visible
Partner registration may be disabled. Contact the platform administrator to:
- Enable partner registration in Settings → Onboarding → Partner Registration
- Or have them create a partner account for you by hand
"Registration is temporarily unavailable"
This means no active primary network has been configured. The platform administrator needs to:
- Go to Admin → Networks
- Ensure at least one network exists, is active, and is primary
- Fresh installations include a default primary network; upgraded installations may need to designate one by hand
Too many requests
If you see a "too many requests" error, the platform is protecting against abuse. Wait 10 minutes and try again. This limit resets automatically.
Email verification failed
If your verification code doesn't work:
- Make sure you're using the most recent code
- Check that the code hasn't expired (10-minute limit)
- Request a new code by clicking "Resend"
- Contact support if issues persist
Related topics
- Partners overview: Learn what you can do as a partner
- Understanding clubs: Organize programs and staff internally