Skip to content

Branding.

Customize your installation's name, logo, colors, and identity.

Jul 21, 2026

Customize Reward Loyalty to match your brand. Upload your logo, choose your primary brand color, and configure your application name, all from the admin dashboard.

Configuring branding

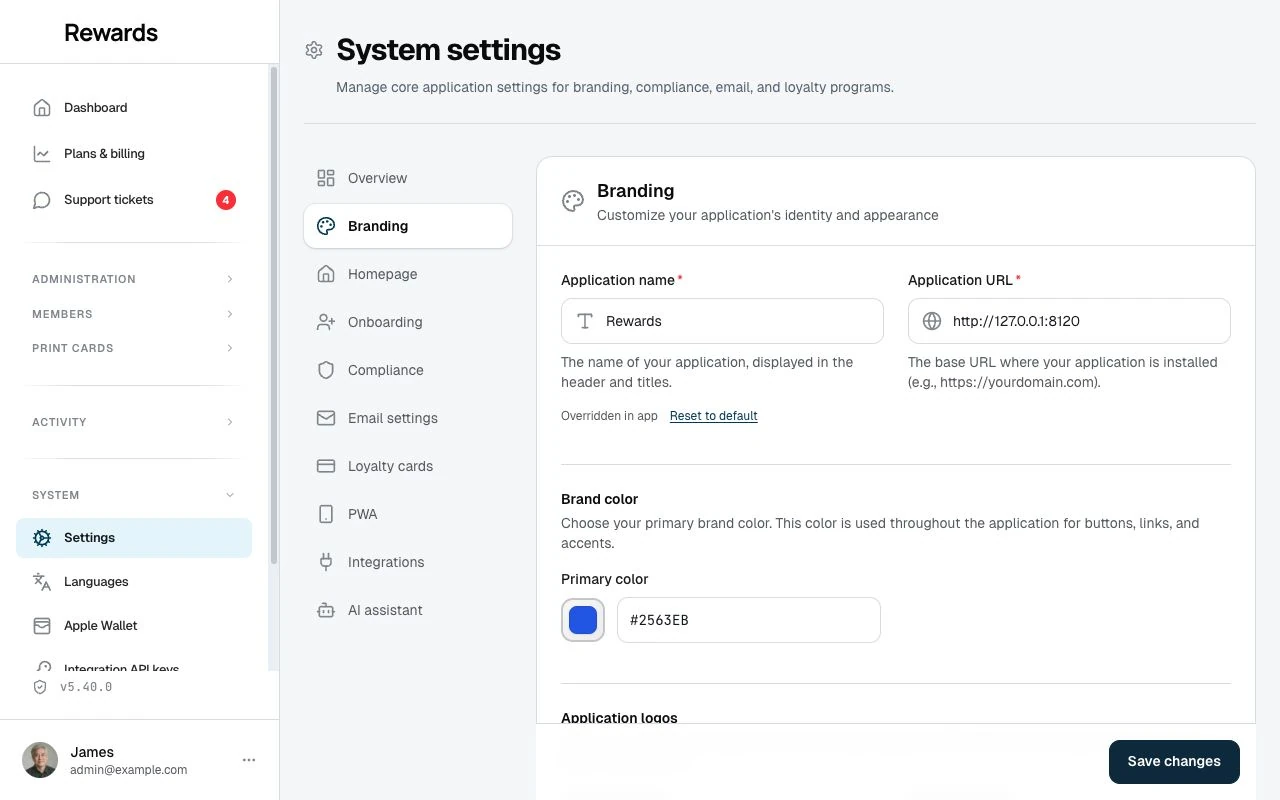
Navigate to Settings > Branding tab in the admin dashboard. This page contains all branding configuration options organized into four sections:

  • Basic Settings: Application name and URL
  • Brand Color: Your primary color that appears throughout the app
  • Logo Uploads: Upload logos for light and dark themes
  • Favicon: Upload the icon shown in browser tabs and bookmarks

The Branding settings with application name, brand color picker, light and dark logo uploads, and favicon.

Changes take effect as soon as you click Save.

Application name

The application name appears throughout the app including browser tab titles, email headers and footers, system messages, and PWA install prompts.

  1. Navigate to Settings in the admin sidebar
  2. Click the Branding tab
  3. Update the Application Name field
  4. Click Save

You can also configure this via the environment file:

APP_NAME="Your Brand Name"

💡 Tip: Settings configured in the admin dashboard override environment variables.

Application URL

The base URL where your installation is installed. This is used for generating links in emails and QR codes.

  1. Navigate to Settings > Branding tab
  2. Update the Application URL field (e.g., https://yourdomain.com)
  3. Click Save

Brand color

Choose a primary brand color that reflects your business identity. The app generates a complete color palette from your selection, with consistent tones across buttons, links, accents, analytics charts, and interactive elements.

Setting your brand color

  1. Navigate to Settings > Branding tab
  2. Find the Brand Color section
  3. Click the color picker or enter a hex code (e.g., #8B5CF6 for purple)
  4. Click Save

You can also set a baseline via the environment file:

BRAND_COLOR="#8B5CF6"

A color saved in the dashboard overrides the .env value.

Your brand color applies across all portals (admin, partner, staff, and member) right away, with no technical changes or CSS recompilation.

How it works

When you select a brand color, the system generates 11 shades (from very light to very dark) and uses them throughout the interface:

  • Buttons and links use your primary color
  • Hover states use slightly lighter/darker variations
  • Backgrounds use very light tints
  • Dark mode adjusts all shades for proper contrast

The default brand color is blue (#2563EB). When no custom color is set, the app uses this standard blue theme.

Color selection tips

  • Choose a dominant color from your existing brand guidelines
  • Avoid very light colors: They may not provide enough contrast for buttons
  • Test in dark mode: Your color should work well on both light and dark backgrounds

Upload your logo through the admin dashboard. The system supports separate logos for light and dark themes, so your branding looks right whichever theme a user prefers.

  1. Navigate to Settings > Branding tab
  2. Scroll to the Logo Uploads section
  3. Click the upload area or drag and drop your logo file
  4. For Light Mode Logo, upload a logo that works on light backgrounds
  5. For Dark Mode Logo, upload a version that works on dark backgrounds
  6. Click Save

Supported formats

The following file formats are supported for logo uploads:

Format Best For
SVG Recommended: scales to any size
PNG Great for logos with transparency
JPG/JPEG Suitable for photographic logos
WebP Modern format with excellent compression

Maximum file size is 2MB.

Logo recommendations

  • Height: Design for 32-40 pixels display height
  • Background: Use transparent backgrounds (PNG or SVG)
  • Aspect ratio: Horizontal or square logos work best
  • Dark mode: Provide a light-colored or inverted version for dark backgrounds

Logo baselines via .env

You can point to logo files via the environment file. An image URL or path set here acts as the baseline; a logo uploaded in the dashboard takes precedence:

APP_LOGO="/files/logo-light.svg"
APP_LOGO_DARK="/files/logo-dark.svg"

Fallback behavior

If no logo is uploaded, the app displays a branded badge with the first letter of your application name, styled with your brand color.

To remove an uploaded logo and revert to the fallback badge:

  1. Navigate to Settings > Branding tab
  2. Click the × button on the logo preview
  3. Click Save

Favicon

Upload a custom favicon, the small icon shown in browser tabs, bookmarks, and history.

  1. Navigate to Settings > Branding tab
  2. Scroll to the Favicon section
  3. Upload your icon file
  4. Click Save

Accepted formats are ICO (traditional) and SVG (modern, scalable). Maximum file size is 512 KB. To remove a custom favicon and revert to the default, click the × button on the preview and save.

What you can customize

Setting Configurable Method
Application Name ✅ Yes Dashboard or .env (APP_NAME)
Application URL ✅ Yes Dashboard or .env (APP_URL)
Brand Color ✅ Yes Dashboard or .env (BRAND_COLOR)
Light Mode Logo ✅ Yes Dashboard upload or .env (APP_LOGO)
Dark Mode Logo ✅ Yes Dashboard upload or .env (APP_LOGO_DARK)
Favicon ✅ Yes Dashboard upload

Dashboard values win: a setting saved in the dashboard overrides its .env counterpart.

Email branding

Emails use your configured application name in the header and footer:

  • Email Header: Displays your application name as text
  • Email Footer: Shows "© [Year] [Application Name]. All rights reserved."
  • Sign-off: "The [Application Name] Team"

Note: Emails do not show uploaded logos yet. Only the application name text appears.

Partner emails (loyalty, stamps, vouchers, tiers, campaigns)

All emails related to a partner's loyalty programs use the partner's business identity:

  • From Name: Uses the partner's Business Name (or account name as fallback)
  • From Address: Uses the system email address for deliverability (SPF/DKIM compliance)
  • Reply-To: Routes to the partner's Business Email (or account email as fallback)

Partners configure their sender identity in Business settings > Branding. This covers points notifications, stamp card progress, voucher receipts, tier changes, and email campaigns.

PWA branding

If members install your installation as a Progressive Web App (PWA), additional branding appears:

  • App Name: Displayed in install prompts and app info
  • Short Name: Shown on home screens (max 12 characters)
  • Theme Color: Browser address bar color on mobile
  • Background Color: Splash screen background when app launches

Configure these in Settings > PWA tab. See PWA Configuration for full details.

Consistency tips

Keep branding consistent across all touchpoints:

  • ✅ Use the same logo everywhere
  • ✅ Ensure your logo works on both light and dark backgrounds
  • ✅ Choose a brand color that complements your logo
  • ✅ Match your PWA branding to your main application
  • ✅ Use a professional, recognizable name

All users (administrators, partners, staff, and members) see consistent branding throughout the app.

Troubleshooting

Logo not displaying after upload

If your logo doesn't appear after saving:

  1. Check file format: Ensure you uploaded a supported format (SVG, PNG, JPG, WebP)
  2. Check file size: Maximum size is 2MB
  3. Clear browser cache: Hard refresh with Cmd+Shift+R (Mac) or Ctrl+Shift+R (Windows)

Logo looks blurry

Cause: The image resolution is too low for the display size.

Solution: Use SVG format (vector graphics) or provide a high-resolution PNG at least 2x the intended display size. SVG is best here because it scales to any size.

Brand color not applying

Cause: Your browser cached the old styles.

Solutions:

  1. Hard refresh: Ctrl+Shift+R (Windows/Linux) or Cmd+Shift+R (Mac)
  2. Clear browser cache
  3. Run php artisan config:clear and php artisan cache:clear on the server

Dark mode logo not showing

Cause: Dark mode logo only appears when the user's system or browser is set to dark mode.

Verification: Toggle your system to dark mode to confirm the logo switches.


Cookies on this site.

Google Analytics runs only if you allow it. Cookie policy