
System settings.
Overview of installation-wide settings in the admin dashboard
On this page
System Settings gives you complete control over your application's branding, member experience, email configuration, compliance features, and loyalty card behavior from one dashboard.
Accessing system settings
- Sign in to your admin dashboard
- Navigate to Settings in the admin sidebar
- Pick an area from the side navigation to open its settings
Who can access this
Only Super Administrators (the highest admin role) can view and modify system settings. This ensures critical configuration stays protected.
Configuration areas
System Settings is organized into sections you move between from a side navigation. It opens on an Overview that names every setting in one place: a card for each section below, plus cards for the app surfaces that hold their own controls (License and updates, Health center, and, for full administrators, Languages & translations, Plans & billing, Plans, and Provider credentials; Integration API keys appears when the Agent API is enabled). The Languages & translations card also counts the translation work waiting after an update. Select a card to open its section or surface. A section also opens from a bookmarked link and skips the Overview.
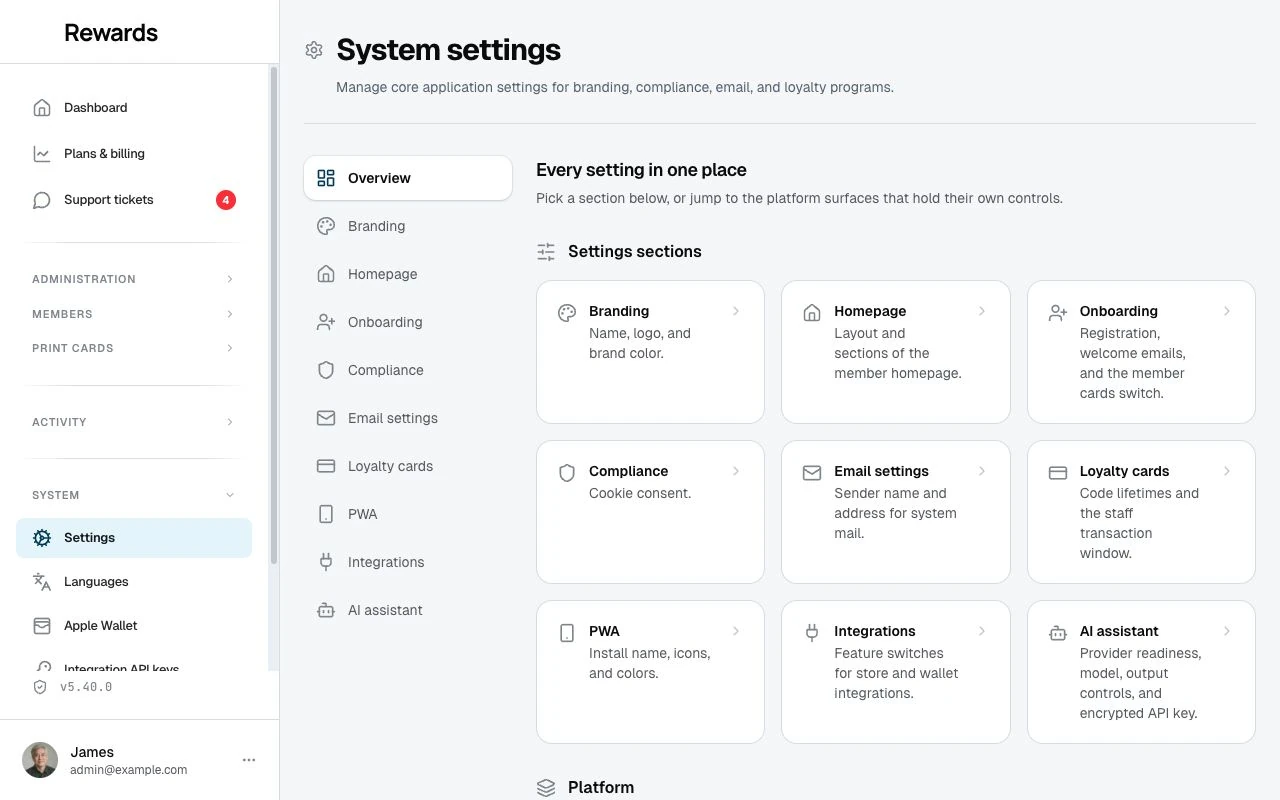
| Section | What You Configure |
|---|---|
| Branding | Application name, URL, brand color, logos, favicon |
| Homepage | Public landing page layout style, plus the Showcase hero image and content toggles |
| Onboarding | Partner registration, anonymous member mode, the Member cards switch, and the invite-businesses disclaimer |
| Compliance | Cookie consent banner (GDPR) |
| Email Settings | Sender name and email address |
| Loyalty cards | Redemption codes, member limits, staff visibility |
| PWA | Progressive Web App settings and icons |
| Integrations | Feature switches for WooCommerce, Shopify, and the Agent API, plus Google and Apple Wallet setup |
| AI assistant | Provider readiness, model, output controls, and an encrypted write-only API key |
Section overview
Branding
Customize your application's identity and appearance.
| Setting | Purpose |
|---|---|
| Application Name | Appears in browser tabs, emails, and system messages |
| Application URL | Base URL for email links and QR codes |
| Primary Color | Brand tint for buttons, links, and selected states. Member and staff PWA theme colors are configured separately. |
| Light Mode Logo | Logo displayed on light backgrounds |
| Dark Mode Logo | Logo displayed on dark backgrounds (optional) |
| Favicon | Custom icon displayed in browser tabs, bookmarks, and history |
Logo Guidelines:
- SVG format recommended for crisp scaling
- Horizontal logos work best (max 200×60px display)
- Use transparent backgrounds when possible
- Accepted formats: SVG, PNG, JPG, and WebP (max 2MB)
Favicon Guidelines:
- Accepted formats:
.ico(traditional) or.svg(modern, scalable) - Max file size: 512KB
- If no custom favicon is uploaded, the neutral wallet favicon is used
- Member and staff apps use the PWA theme color for supported browser chrome.
Homepage
Configure how visitors experience your public landing page.
| Layout Style | Best For |
|---|---|
| Smart wallet | One business with several campaigns, or a curated set of businesses. Groups published programs into a wallet-style homepage. |
| Showcase | Single businesses. Editorial presentation with featured programs. |
| Portal | QR-driven flows. Minimal sign-in focused landing. |
| Public listing | A place full of businesses (malls, districts, associations). Searchable, filterable directory of every published program. |
Showcase options
When the Showcase layout is selected, the section shows its extra settings:
| Setting | Purpose |
|---|---|
| Hero background image | Optional background image for the hero section. Use a high-quality image (recommended 1920×1080 or larger). |
| Show "How it works" section | Display a three-step guide explaining the loyalty process |
| Show membership tiers | Preview available membership tiers to encourage signups |
| Show member count | Display total registered members as social proof |
Full guide: Homepage Layout
Onboarding
Configure how new members join and interact with your loyalty programs.
Partner registration
Control whether businesses can create their own partner account, and what happens when one signs up.
| Setting | Purpose |
|---|---|
| Allow partner self-registration | When on, businesses can create their own partner account at /partner/register and start on the default plan. When off, only an admin creates partners. |
| Email me when a partner signs up | Send a notification to your operator email each time a business finishes signing up, so you can follow up with a personal welcome. On by default. |
| Send new partners a welcome email | Email each new business a short guide to their first steps the moment they verify their email. On by default. |
| Invite businesses: scoreboard disclaimer | Text shown on the referral scoreboard of each partner with Invite businesses enabled. Leave blank to use the default message. |
Where the notification goes: the app sends it to
APP_ADMIN_EMAILif you set one, otherwise to the root admin address captured at install. If neither is a real address, it skips the email and records a short note in the log instead. Demo installs send neither email.
Full guide: Partner Registration
Member cards
| Setting | Purpose |
|---|---|
| Member cards | The installation switch for the whole member-cards family: both Card studios, the generated-cards lists, and the member's "Show my code" wallet QR. Turning it off hides every design and issuing surface; cards already handed out keep working at the counter. On by default. |
Full guide: Member cards admin setup
Anonymous members
Enable zero-friction onboarding for visitors.
| Setting | Purpose |
|---|---|
| Enable anonymous mode | Visitors can use loyalty features without registering. The app creates a member account and links it to their device. |
| Also log out anonymous members | End all sessions for members who haven't added an email address. Only available when disabling anonymous mode. |
| Member code length | Each anonymous member gets a unique code. Shorter codes look friendlier, longer codes support more members. |
How it works: Visitors become members at once. No signup required. They can earn points, collect stamps, and claim rewards right away. To access their account on other devices or receive emails, they can add an email address at any time.
Full guide: Anonymous Members
Compliance
Privacy and regulatory compliance settings.
| Setting | Purpose |
|---|---|
| Enable Cookie Consent Banner | Show or hide the cookie consent banner on the frontend |
Custom tracking: The banner records the visitor's choice. Custom scripts must check the consent helper before running. See Cookie consent.
Full guide: Cookie Consent & Compliance
Email settings
Configure how emails are sent from your application.
| Setting | Purpose |
|---|---|
| Mail From Name | The name that appears as the sender of outgoing emails (e.g., "Reward Loyalty") |
| Mail From Address | The email address used as the sender for outgoing emails |
A live Email Preview shows how emails will appear to recipients.
Provider setup: See Email configuration for connection settings. This tab controls sender details and the email appearance.
Loyalty cards
Control loyalty program behavior, limits, and security settings.
Member settings
| Setting | Purpose |
|---|---|
| Max Member Request Links | The maximum number of point request links a member can generate |
Redemption settings
| Setting | Purpose |
|---|---|
| Reward Claim QR Expiry | How long a member's reward claim QR code stays valid. Shorter times protect against replay attacks. |
| Redemption Code Validity | The default validity for staff-generated codes. Staff can pick a different validity, from 1 hour to 1 month, per code when they generate it |
Staff settings
| Setting | Purpose |
|---|---|
| Staff Transaction Visibility (Days) | Number of days a staff member can see members they interacted with in their dashboard |
Privacy & Security Notice: This setting helps protect member privacy by limiting how long staff can view member interaction history. Lower values improve privacy but may reduce staff efficiency.
Full guide: Loyalty cards Settings
PWA
Configure installable app settings and icons for the Progressive Web App.
HTTPS Required: PWA features require HTTPS (SSL certificate) to work.
| Setting | Purpose |
|---|---|
| App Name | Full name shown in install prompts |
| Short Name | Shown on home screen (max 12 characters) |
| Description | Brief description shown when installing the app (keep under 132 characters) |
| Theme Color | Browser toolbar color |
| Background Color | Splash screen background |
App icons
Upload square PNG images for home screen and app drawer. The app resizes the icons.
| Size | Purpose |
|---|---|
| 192×192 Icon | Used for home screen on mobile devices |
| 512×512 Icon | Used for app drawer and splash screen |
Icon Guidelines:
- Use square images (1:1 aspect ratio)
- PNG format recommended for best quality
- Solid background color works best (avoid transparency)
- Use your brand colors and logo
Full guide: PWA Configuration
Integrations
Turn features on or off, check Google Wallet, and open the Apple Wallet signing workspace. This section is always available.
Feature switches
Each switch turns a feature on for the whole installation. A switch that differs from its server default is saved as an application override, so you can manage it without editing files.
| Switch | What it does |
|---|---|
| WooCommerce | Enables the WooCommerce integration for partners |
| Shopify | Enables the Shopify integration for partners (early access) |
| Agent API | Enables the machine-to-machine Agent API and Integration API key management |
Google Wallet is a plan feature, not a switch. Gold and Platinum include it by default; an operator sets it per plan on the Plans page, with a per-partner override on the Permissions tab. You configure only its credentials here, in the Google Wallet card right below the switches. See Google Wallet Integration.
Outbound webhooks are not a switch here. Webhooks comes with a partner's plan (Gold and Platinum include it by default), turned on or off per tier from the Plans editor, with a per-partner override on the Permissions tab. See Webhooks overview and setup.
Google Wallet credentials
Right under the integration switches, the Google Wallet card shows a configured/not-configured badge and lets you enter the credentials. These save together with the rest of the settings page.
| Field | Notes |
|---|---|
| Issuer ID | Your Google Wallet issuer ID. Stored in the clear; clearing it falls back to your environment. |
| Credentials file path | Path to the service-account JSON file, if you use a file. Stored in the clear; clearing it falls back to your environment. |
| Service account JSON | The service-account key, pasted inline. It is write-only: stored encrypted, never shown again, blank keeps the current value, and a Clear checkbox removes it (back to your environment). |
The encrypted JSON overrides the environment value. You can still set GOOGLE_WALLET_ISSUER_ID and the credentials in .env instead. See Google Wallet Integration for the full setup.
Once the credentials are saved, a Test connection button appears on the card. It runs a live check that the service account can authenticate with Google and reports a short status. It confirms the credentials only, not the issuer permissions or whether passes will provision, which stay Google-side, and never shows the credential value.
Apple Wallet signing
Apple Wallet is a plan feature with its own protected workspace. Gold and Platinum include it by default, and each business can have a separate permission override. Open Settings → Apple Wallet to add the Pass Type ID, Team ID, password-protected .p12, and Apple WWDR certificate, then validate the identity with a safe sample pass.
The signing identity belongs to the installation operator. Businesses choose which programs to offer and how each pass looks; they never receive the certificate or password. See Administrator setup and certificate custody before adding credentials or using the Break glass reset.
Note: Save stores only differences from the server default. Reset to default removes an application override so the switch follows its
.envor built-in value again.
AI assistant
Configure the writing tools that appear in supported partner form fields.
| Setting | Purpose |
|---|---|
| Enable AI writing assistant | Shows AI actions when a provider key resolves and the field supports AI |
| Model | Free-text model id for OpenAI, DeepSeek, or another OpenAI-compatible provider |
| Temperature | Output variation from 0 through 2 |
| Maximum output tokens | Optional response-length limit; blank returns to the server default |
| API key | Write-only encrypted key with explicit Keep, Replace, and Clear actions |
The readiness card checks for an enabled switch, key, model, and endpoint. It does not call the provider. Organization, base URL, system prompt, and prompt templates remain server-managed.
Each request sends the configured system prompt, the partner's entered text, and the signed-in partner email to the configured endpoint. Choose a provider whose privacy and retention terms fit your installation. Partners should review generated text before publishing it.
Full guide: AI writing assistant
How settings work
Settings you configure here take priority over everything else:
| Priority | Source | Description |
|---|---|---|
| 1 (Highest) | Dashboard settings | What you set in System Settings |
| 2 | .env file values |
Server configuration |
| 3 (Lowest) | Default configuration | Built-in defaults |
Save stores only values that differ from the server configuration. Matching values have no application override. Returning a value to the server default removes an existing override.
An overridden field shows Overridden in app and Reset to default. Reset removes that field's override immediately and restores its server value, while keeping your other unsaved edits on the page. Without an override, later configuration changes apply again. The Save bar stays visible within each settings section; Overview has no fields to save.
Tip: Use the dashboard for values you want to manage there. An application override wins over
.env; use Reset to default or the credential's separate Clear action to return to the server value.
Key concepts
Demo mode protection
If your application is running in demo mode (APP_DEMO=true), you won't be able to save or reset settings. This protects demo installations from changes.
Audit logging
The system logs who changed a setting and when. For non-secret values, it records the old and new values. For credentials, it records only the key name and whether the operator updated or cleared it. The secret itself never enters the activity record.
These records help you investigate settings changes. See Activity logs for more details.
Related topics
- Anonymous members: Zero-friction onboarding
- Homepage layout: Smart wallet, Showcase, Portal, and Public listing layouts
- Branding: Name, logo, and URL configuration
- Email configuration: Sender settings and email appearance
- Cookie consent & compliance: Banner settings and custom script consent
- Loyalty cards settings: Card behavior and limits
- PWA configuration: Progressive Web App settings
- Google Wallet Integration: Member passes for Android
- Apple Wallet passes: Signed member passes for Apple Wallet
- AI writing assistant: Provider setup, privacy, and key recovery
- Activity logs: View all setting changes