SaaS setup guide.
End-to-end guide for enabling multi-tenant SaaS features, including plans, billing, networks, partner registration, and verification.
This guide walks you through the full SaaS enablement path, from initial plan configuration to verifying that everything works. Follow the steps in order; each one builds on the previous.
Who is this for? Network operators, white-label agencies, and anyone running Reward Loyalty as a multi-tenant installation where partners (businesses) sign up, receive plan-based limits, and manage their own loyalty programs. If you run a single business, you don't need this guide.
Step 1: Configure plan tiers
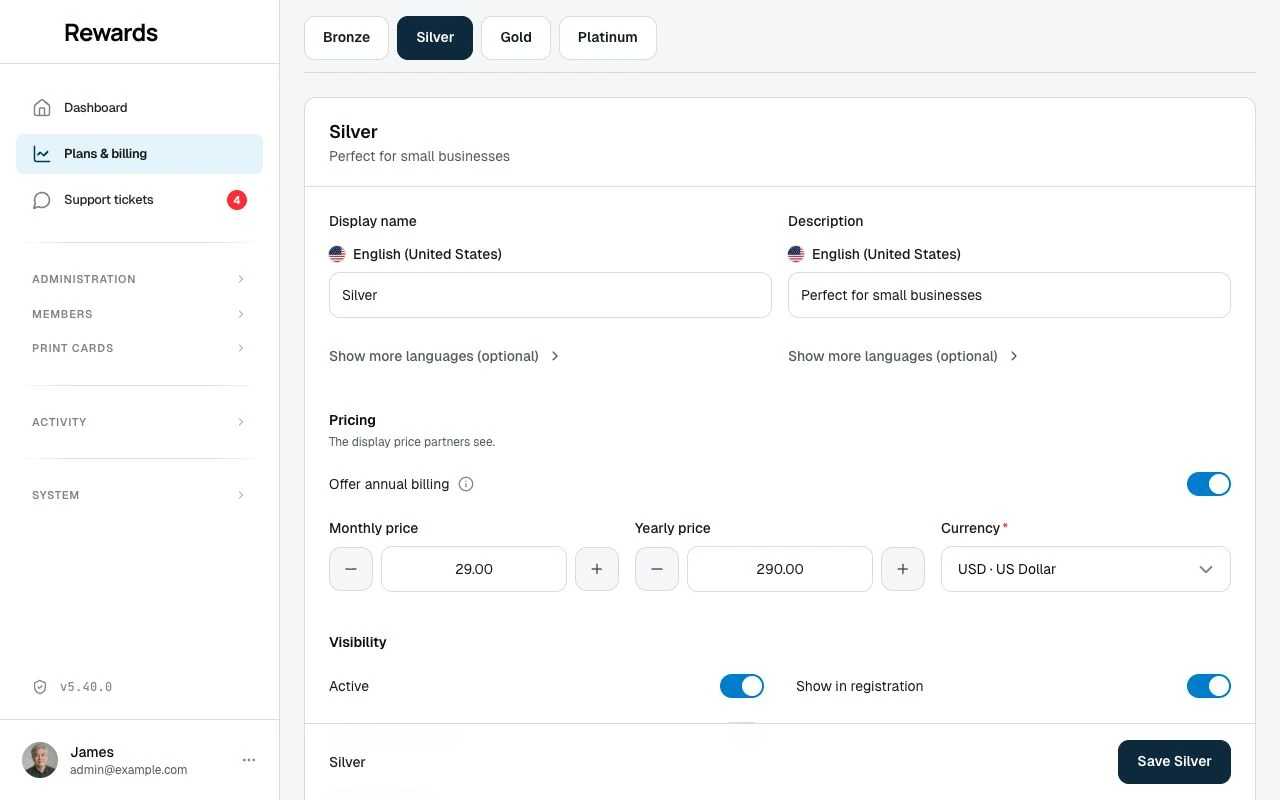
A plan tier sets what a partner can do: their resource limits, their feature flags, and their pricing. The product ships with four tiers, ready to use:
| Tier | Default Name | Purpose |
|---|---|---|
tier1 |
Bronze | Testing and very small businesses |
tier2 |
Silver | Small businesses ready to grow |
tier3 |
Gold | Multiple programs and advanced features |
tier4 |
Platinum | No limits |
Each tier sets resource limits (loyalty cards, stamp cards, vouchers, prepaid passes, members, staff, rewards, clubs, agent keys), feature flags (voucher campaigns, email campaigns, prepaid passes, Agent API), monthly and yearly pricing, and display details (name and visibility). Tier order (sort_order) and the default-tier choice (is_default) live in config/plans.php only. They are structural, so they are not .env-tunable.
You can launch on the shipped tiers without changing anything. When you want a different limit, price, feature, or name, set it in .env.
Set plan values in .env
Most plan values have an environment variable named PLAN_<TIER>_<SETTING>, both uppercase. Set the ones you want to change and leave the rest on their defaults. The config-only structural fields are the exception. is_default (the starting tier), sort_order (tier ordering), and the internal *_key translation keys stay in config/plans.php and are not read from the environment:
PLAN_TIER1_MAX_MEMBERS=500 # raise the free tier's member allowance
PLAN_TIER2_PRICE_MONTHLY=3900 # Silver at $39.00/month (price in cents)
PLAN_TIER2_HAS_EMAIL_CAMPAIGNS=true # turn a feature on for a tier
PLAN_TIER2_NAME="Starter" # rename a tier
Changes apply on the next request. Numbers use -1 for unlimited, and booleans accept true/false. The app ignores a value that does not parse, and the default stays, so a typo can never switch off a feature or zero a limit by mistake.
The tier marked as default receives every new partner, whether an admin creates them or they sign up themselves. Bronze, the free tier, is the default out of the box, so businesses start free with no card required. Only is_default in config/plans.php sets the default (not .env and not the admin editor), which keeps "new businesses start on the free tier" a single, deliberate rule; to hand new partners a different tier, change is_default in that file. Because updates replace config/plans.php (see the note below), an is_default change is the one plan edit you re-apply after each update.
Where the defaults live. The four tiers are defined in
config/plans.php. That file ships as pure defaults and updates replace it, which is how a new plan key (such as the annual-billing flag) reaches every install. Do not put your own values in the file; the next update overwrites them. Keep your changes in the two layers that survive every update:.env(PLAN_<TIER>_<SETTING>) and the admin Plans editor. If you edited the file on a version before 5.10.0, when the updater still protected it, re-enter those values once in either layer after updating.
📖 Configuring plan values from the environment is the full reference: every setting, localized plan names, how a per-partner override layers on top, cache behavior, and how to verify the result. Partner Registration → Plan Configuration explains what each field means and how minor-unit pricing works.

Step 2: Choose a billing mode
Reward Loyalty supports three billing modes. Choose one:
Option A: Manual billing (default)
No configuration needed. This is the default when BILLING_PROVIDER is not set in .env.
- Admins assign plans via the partner management CRUD
- You invoice partners through your accounting software (QuickBooks, Xero, bank transfers, etc.)
- All partners are treated as fully active, with no billing restrictions
Best for: Agencies, network operators, and white-label deployments where you already have a billing relationship with partners.
Option B: Stripe billing
Set BILLING_PROVIDER=stripe in .env and configure API keys, webhook secret, and price IDs.
- Stripe manages subscription lifecycle via webhooks
- Self-registered partners can subscribe from the billing page. Stripe Checkout creates the customer.
- Admin-created partners without Stripe IDs are treated as
legacy(full access, admin-managed) - Existing subscribers manage their plan via the Stripe billing portal
Best for: Operators who want automated subscription billing with payment processing.
What Stripe mode does: Webhook-driven subscription sync, self-service Checkout for new self-registered partners, billing portal for existing subscribers, and subscription status on the partner billing page. Admin-created partners remain admin-managed until an admin links them to a Stripe customer. Self-registered partners (those who signed up via the registration page) can initiate Stripe Checkout themselves. Cashier creates the Stripe customer during the checkout session.
📖 Full setup, step by step: Stripe Billing.
Option C: PayPal billing
Set BILLING_PROVIDER=paypal in .env and configure REST app credentials, a webhook id, and PayPal Billing Plan IDs.
- PayPal manages subscription lifecycle via webhooks (the handler re-fetches live state, so processing is idempotent and order-independent)
- Self-registered partners subscribe through the PayPal approval redirect
- Admin-created partners without a PayPal subscription are treated as
legacy(full access, admin-managed) - There is no hosted portal: partners cancel and change plan from in-app screens on My Plan (a plan change is cancel + re-subscribe)
Best for: Operators whose partners prefer to pay with PayPal.
What PayPal mode does: Signature-verified webhook sync, self-service subscription via the approval redirect, in-app cancel and change-plan (portal replacement), and subscription status on the partner billing page.
📖 Full setup, step by step: PayPal Billing. For the billing overview, see Billing Configuration; for the plan tiers, see Plans & pricing.
Step 3: Set up your primary network
Networks organize partners into groups. One network must be marked as primary and active. This is required for partner self-registration.
Fresh installations
The installer creates a Default network that is active, primary, and uses your installation currency. No action needed unless you want to rename it or add more networks.
Existing installations
- Go to Admin → Networks
- Ensure at least one network exists
- Mark it as Active and Primary
- Set the network's Currency. This becomes the default currency for self-registered partners.
Single-primary enforcement: When you mark a network as primary, the app clears the primary flag on all others. Only one primary network can exist at any time.
Currency inheritance: Self-registered partners inherit the primary network's currency. Partners can change their currency afterward via their profile.
📖 See Understanding Networks for network management details.
Step 4: Enable partner self-registration (optional)
Partner self-registration is disabled by default. Most operators prefer creating partner accounts manually. If you want partners to sign up themselves:
- Go to Settings → Onboarding → Partner Registration
- Enable the toggle
Or set APP_PARTNERS_CAN_REGISTER=true in .env as a fallback default (the database setting takes precedence once saved).
What happens when a partner registers:
- They fill in business name, email, and consent
- They verify their email via a one-time code
- They receive the default plan (
is_defaultinconfig/plans.php) - They are assigned to the primary network
- They inherit the primary network's currency
- Their resource limits and feature flags are derived from the default plan
Prerequisites for registration to work:
- Registration must be enabled (Step 4)
- An active primary network must exist (Step 3)
If either is missing, registration stops with a clear error message.
📖 See Partner Registration for the full registration flow, plan comparison cards, and troubleshooting.
Step 5: Verify your setup
After completing the steps above, verify everything is working:
Health center
Go to Admin → Health center and check:
| Check | Expected Status |
|---|---|
| Billing Provider | Manual / Offline, Stripe, or PayPal (green) |
| Cron / Scheduler | OK (if cron is configured) |
📖 See Health center for all diagnostic checks.
SaaS dashboard
Go to Admin → SaaS Overview to see:
- Partner Status Breakdown: All partners and their subscription states
- Plan Distribution: How partners are spread across tiers
- Attention Required: Expiring trials, past-due partners
- Recent Registrations: Latest partner signups
- Usage Overview: Aggregate resource counts

📖 See SaaS dashboard for details on each section.
Test registration (if enabled)
- Open a private/incognito browser window
- Navigate to your installation's partner registration page
- Register with a test email
- Verify you receive the OTP code and can complete registration
- Confirm the test partner appears in Admin → Partners with the correct plan, network, and currency
Step 6: Ongoing operations
Partner management
- Create partners manually via Admin → Partners → Add
- Assign or change plans via the partner edit page. Limits and features update right away.
- Override individual permissions via Partner Permissions. A plan change re-derives limits and features from the new plan, so re-apply any per-partner overrides afterwards.
- Export partner data: CSV/JSON export from the partner list
Monitoring
- SaaS dashboard: Daily overview of subscription health and installation growth
- Health center: System diagnostics and service status
- Activity logs: Audit trail for all admin and partner actions
Partner experience
Each partner sees a My Plan page with:
- Current plan name, description, and status badge
- Feature gates (enabled/disabled for their tier)
- Resource usage progress bars (cards, staff, members, etc.)
- Available plans comparison (Stripe and PayPal modes, always visible)
- Upgrade / Change Plan buttons (Stripe and PayPal modes, self-registered partners only)
- Manage Billing portal link (Stripe mode) or an in-app Cancel Subscription control (PayPal mode), for existing subscribers only
Note: Admin-created and legacy partners see plan cards but no self-service action buttons. They must contact the administrator for plan changes.
📖 See Billing Configuration: Partner Billing Page for details.
Quick checklist
Use this to verify your SaaS setup is complete:
- Billing mode: Manual, Stripe, or PayPal chosen in Billing settings on the SaaS overview (or
BILLING_PROVIDERin.env) - Provider credentials (Stripe or PayPal mode): API keys and the webhook secret/id saved on the Provider credentials screen, or in
.env(STRIPE_KEY,STRIPE_SECRET,STRIPE_WEBHOOK_SECRET/PAYPAL_CLIENT_ID,PAYPAL_SECRET,PAYPAL_MODE,PAYPAL_WEBHOOK_ID) - Plans: Shipped tiers reviewed; any limit, price, feature, or name you want to differ set in the Plans editor (or with
PLAN_*in.env), and one tier marked as the default - Provider price/plan IDs (Stripe or PayPal mode): Each paid tier mapped in the Plans editor's Pricing section, or in
.env(STRIPE_PRICE_*/PAYPAL_PLAN_*) - Primary network: One active, primary network with currency set
- Partner registration: Enabled in Settings → Onboarding (if desired)
- Health center: All checks green
- SaaS dashboard: Accessible and showing correct data
- Test registration: Completed (if registration is enabled)
Related topics
- Billing configuration: Manual, Stripe, and PayPal billing setup
- Plans & pricing: Plan tiers, environment overrides, the Plans editor, currency, and annual billing
- SaaS dashboard: Partner subscription monitoring
- Partner registration: Self-registration flow and plan comparison
- Partner permissions & limits: Fine-grained access control
- Health center: System diagnostics
- Who is this for?: Business models and expectations